chrisinmtown.github.io
Repairing a Jura Nespresso Machine
Or: The Story of the Oval-Head Screw and Kindness of Strangers
27 June 2010, with many updates
Contents
feedback to christopher döt lott át gmail dðt com
Summary
Machine problems? tl;dr? Here’s the diagnosis quickstart, see details far below.
- What the !@#$%^ are these oval screws? Somebody’s attempt to ensure repair-shop business, you can buy or a build a socket to remove ‘em.
- Push buttons don’t work?
Probably poor electric contact, clean the back of the push buttons and maybe re-apply graphite. - Machine doesn’t draw water?
Probably a stuck check valve, free it up with a long thin bamboo stick or by pushing/pulling air via a syringe. - Water leaks out the bottom?
Probably a cracked elbow joint in the high-pressure line from the pump, your only hope is an original part from Europe bcos epoxy will not hold pressure. - Machine won’t turn on?
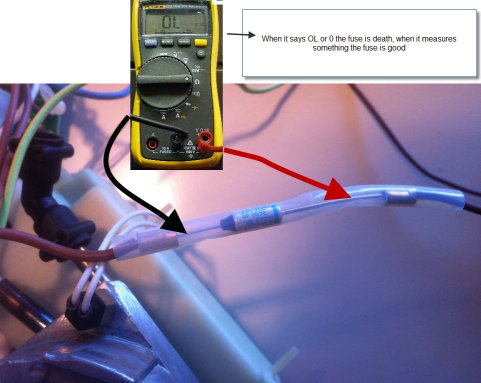
If it’s not bad push buttons, check if the in-line thermal fuses have opened; parts are cheap and are not on the circuit board, so the repair is not too diffcult. - Rapidly blinking lights instead of coffee?
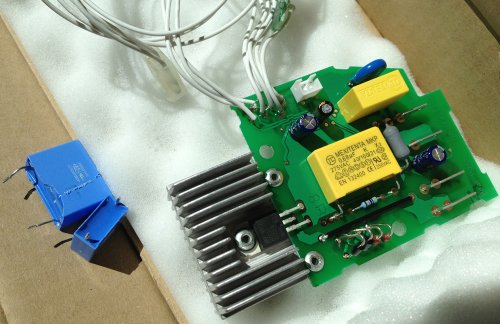
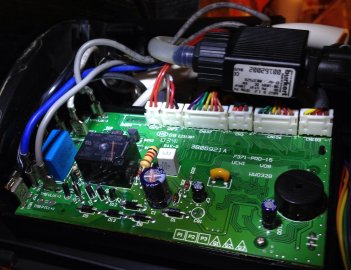
Probably a failed electronic part, here are the usual suspects:- Large rectangular capacitors on the little circuit board have failed for many, replacements are cheap but you have to be handy with a solder iron.
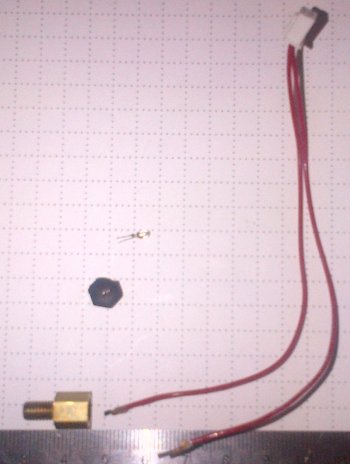
- Temperature sensor in the heater block may have failed. Tiny part so it’s difficult to repair, might need an original part.
My story
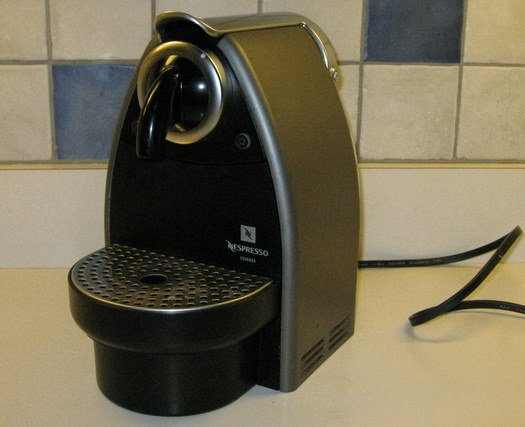
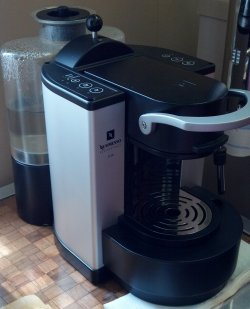
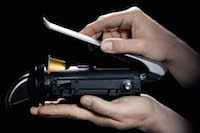
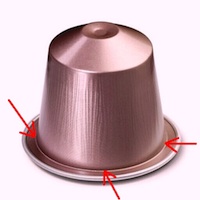
A few years ago my family bought me a basic Nespresso espresso machine, which is made by Jura in Switzerland. It uses little sealed coffee capsules like this one:

The upside to the capsules that that they yield a very nice espresso shot, with no skill required and no mess on the counter. The downside is that they are only available from Nespresso and as of 2010 cost US$0.55 each plus shipping. (Update 2021: Nespresso capsules are far more expensive now, but Nestlé lost their monopoly when their patent expired so you can get cheap capsules now, for example at Trader Joe.)
We used the machine for a couple of years, generating a nice recurring revenue stream for Nestlé while making our morning lattes. But over time the power button became recalcitrant. First it required two pushes to go on, then three pushes, then coaxing with a pencil eraser, and this got ever worse until I was standing there for the better part of a minute pushing, pushing, pushing while waiting for the DANGED (ahem) light to start blinking. Naturally it was out of warranty by then, and sending it away for repair was almost as expensive as a new one. I actually eyeballed a new machine in some mall store where I noticed that the latest Nespresso models have a simple toggle on-off switch, so I sorta suspect this power-button trouble happened on a lot of machines.
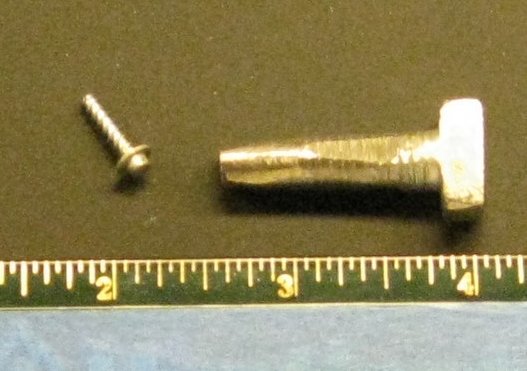
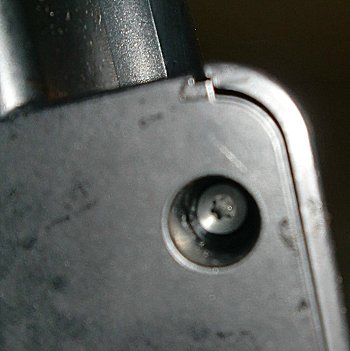
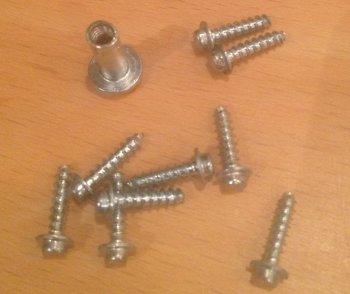
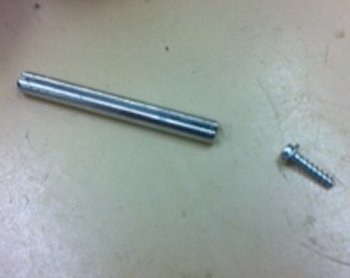
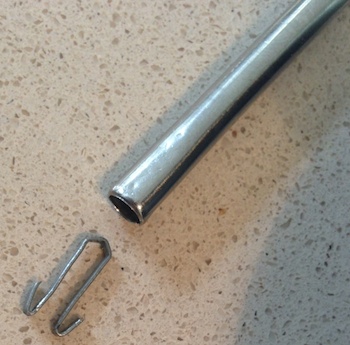
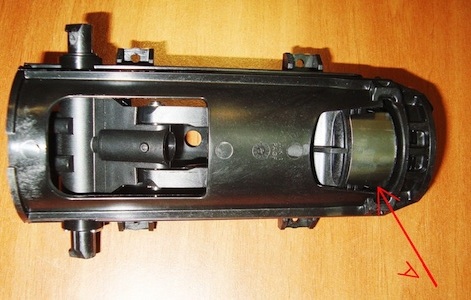
So off to the workbench, where I found that the machine’s sides are held in place by four screws recessed about 1 inch. And the screws have oval heads. I’d never seen anything like that before, and the security-driver kits at Sears had nothing to offer. The deep recess meant a needle-nose plier would not work. I’ve never seen a consumer appliance protected this carefully.
A quick web search found a special tool on ebay for $40. Ouch! I didn’t know if the machine’s brain was bad or what, and $40 seemed like throwing good money after bad, so I let the machine sit on the bench.
A couple weeks (ok I admit it, it was months) later I found leftover capsules in the kitchen and posted a note to Craigslist for someone to take ‘em for free. I grumbled in my note about the funky oval-head screws and offered to give away the machine along with the capsules.
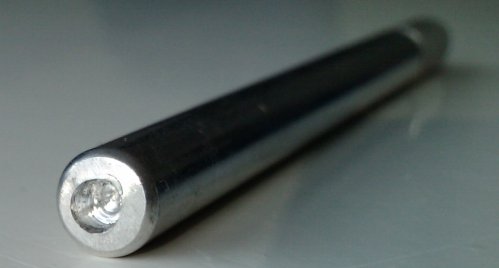
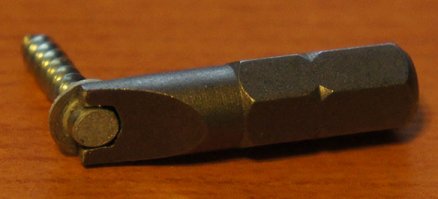
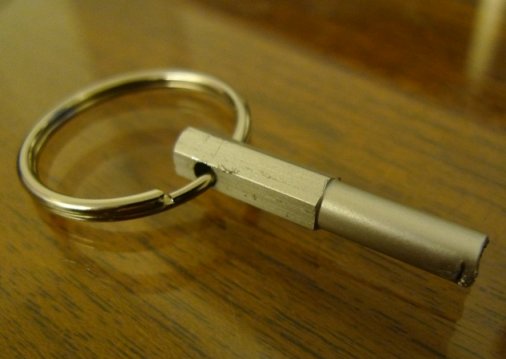
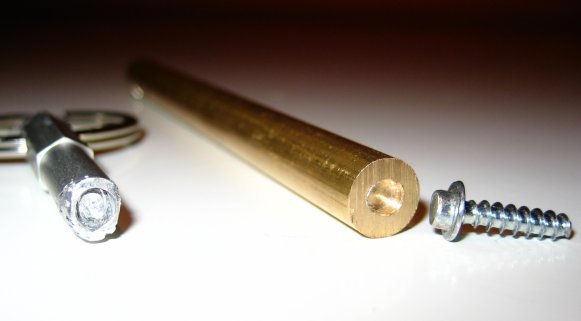
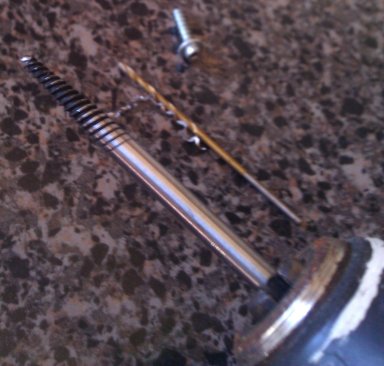
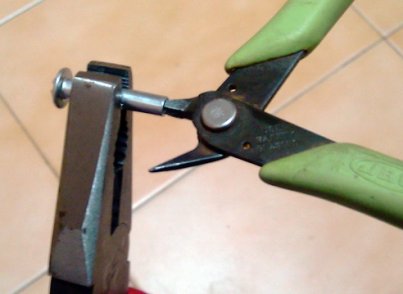
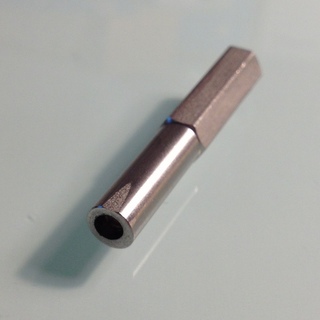
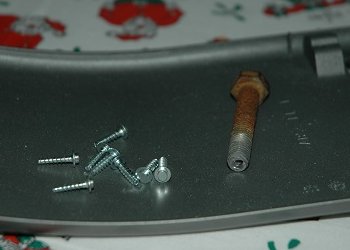
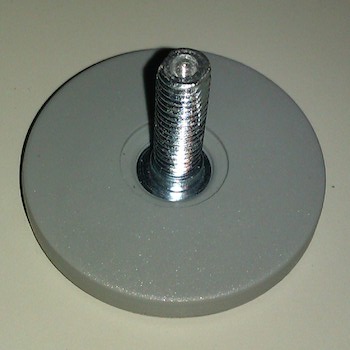
Enter Dave H., a fellow New Jersey resident who responded to my post. His machine had mouse trouble (don’t ask), but he made a socket out of an old bolt! Look at this:
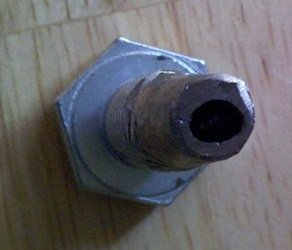
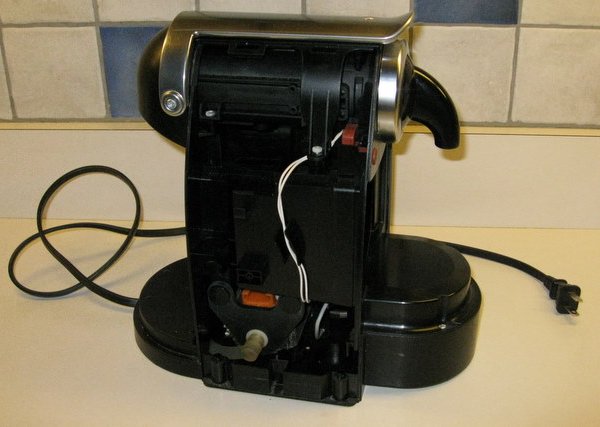
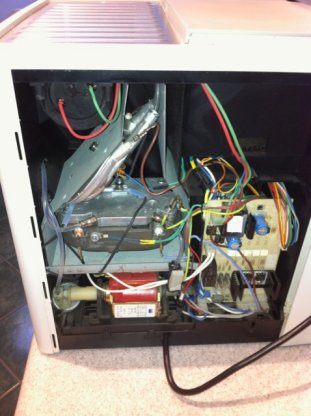
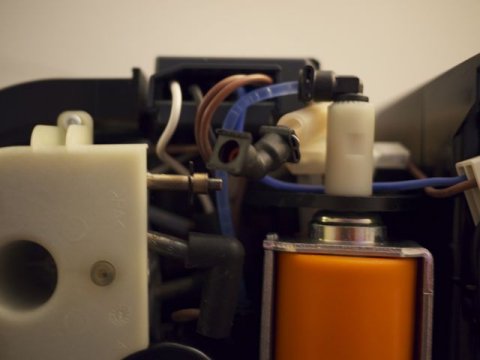
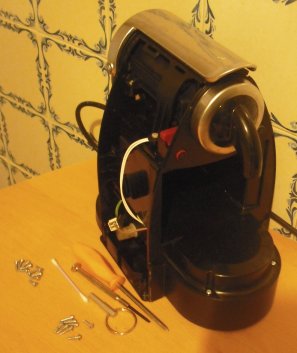
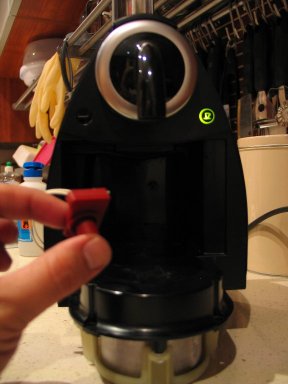
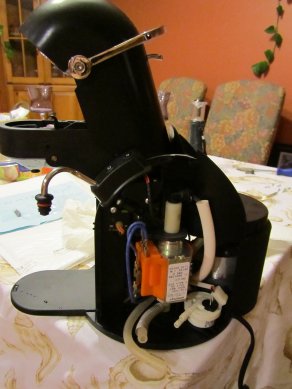
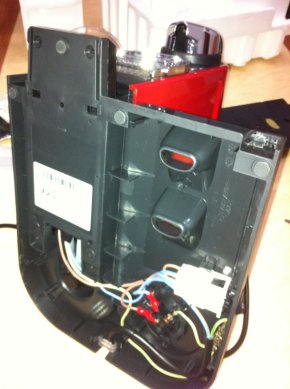
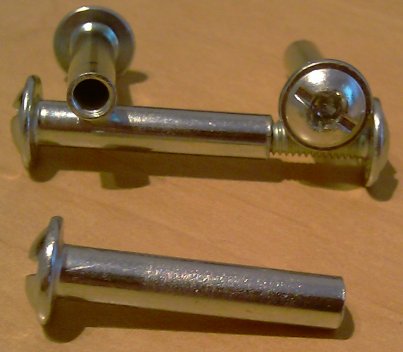
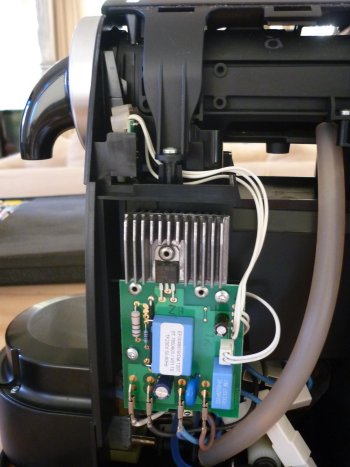
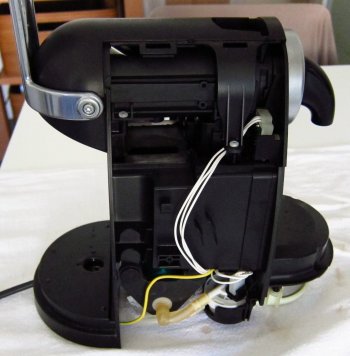
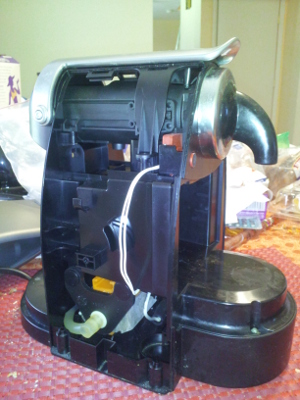
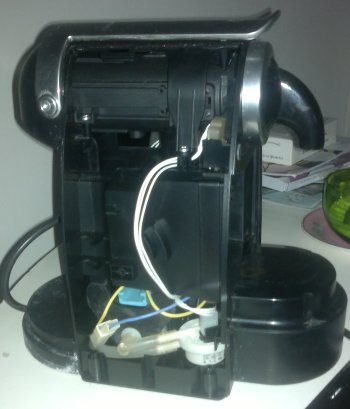
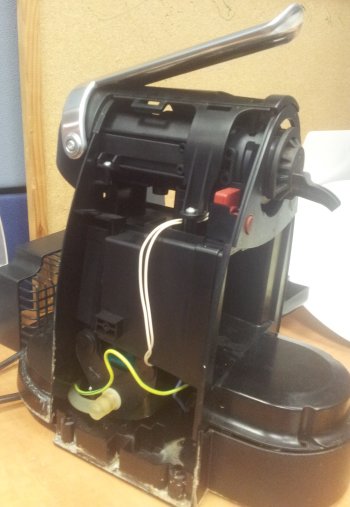
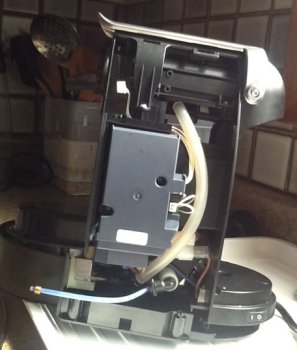
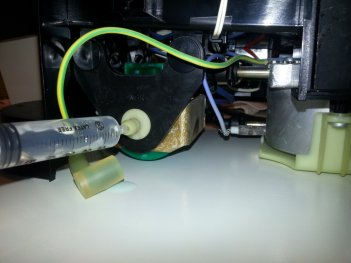
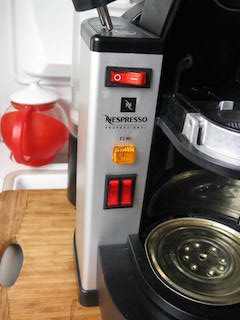
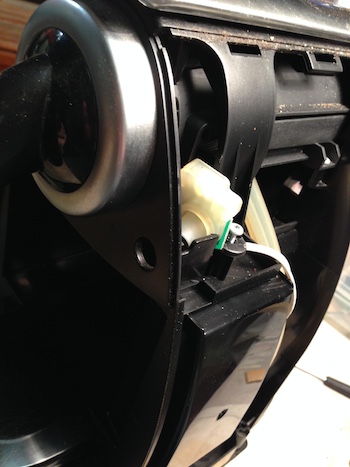
Even better, he sent me the socket!! Complete kindness to total strangers, I love Craigslist. His remanufactured bolt loosened the screws on the very first try. The screws only go into plastic so they require very little force to remove. Here’s the machine with the side panel removed for easy access to the power button. The heater is in front (below the drip tray), and the pump is buried in the middle.
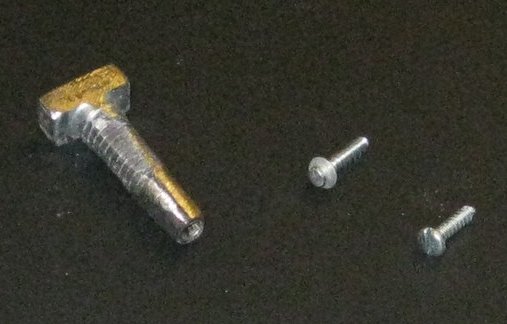
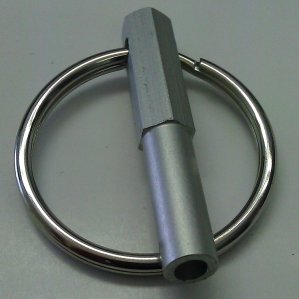
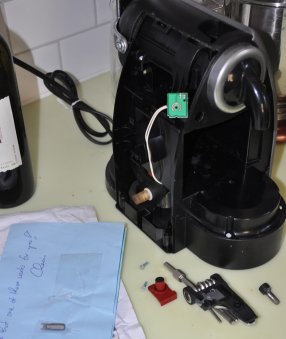
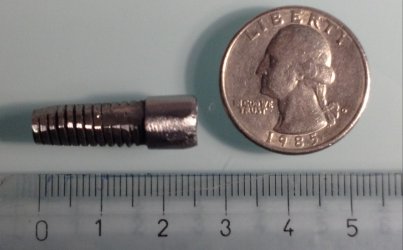
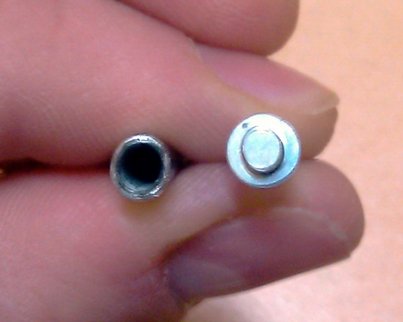
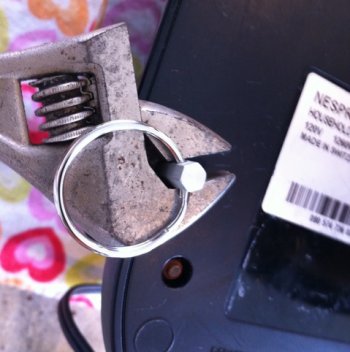
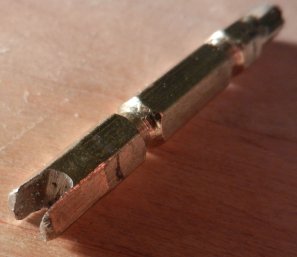
Here’s a close-up of the super secret special swiss oval-head screw (in the middle). I put calipers on it and by comparing it with drill bits estimate that the head is 1/8” at the narrowest and 5/32” at the widest. (Of course it’s probably metric but I don’t own metric drill bits.) Anyhow just 1/32 inch difference is enough. The plain slotted screw I chose as a replacement is on the right.
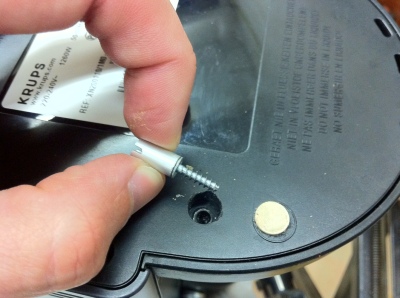
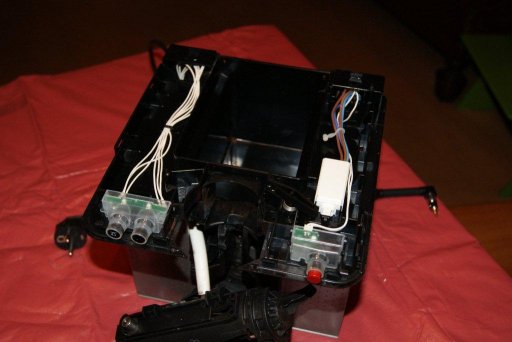
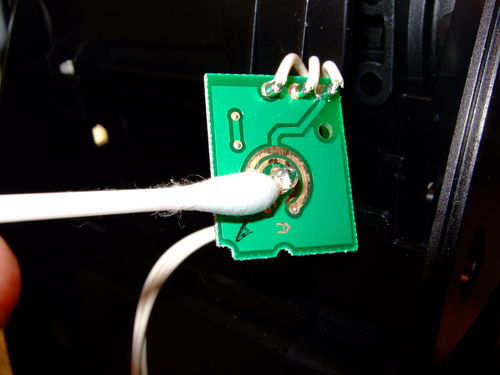
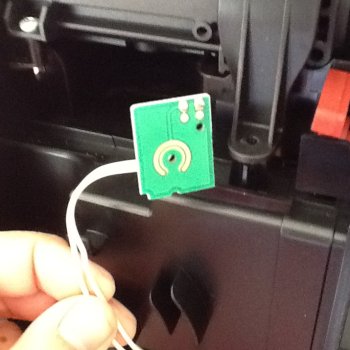
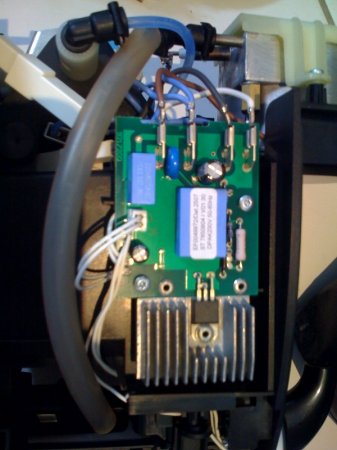
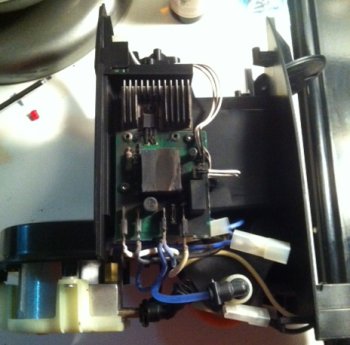
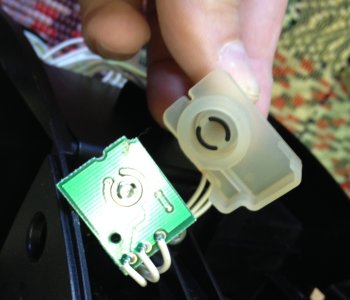
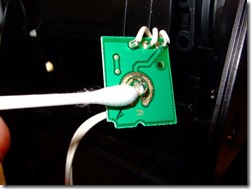
Well, back to the original problem, turning on the machine. The power switch assembly consists of a small circuit board and a molded silicon button. I loosened a bracket behind it (the screw required a Torx driver size T-10) and pulled out the circuit board with the button. Here’s a shot of the board and button:

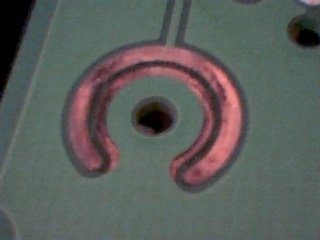
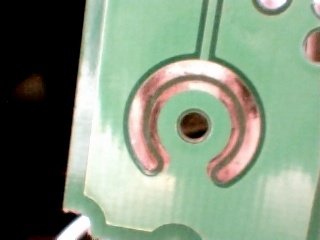
The inside of the button (showing) touches the circuit board when pressed, and springs back a few mm when released. There is no clicky or other moving part on the circuit board, it only has two copper areas exposed, an outer area and a circular inner area (a bit hard to see). Somehow the button completes a circuit when it touches the board. I’m not an EE at all (as has been made very clear to me at work :-) but silicon conducts power?? The end of the button is black as if it were coated in carbon, maybe that’s the secret.
The board didn’t look cracked, so I resorted to the obvious: clean everything. I windexed the board and the end of the rubber button, put them back in place .. and it worked again!! First touch turns on the machine. I was stunned. That’s the happy ending.
If you have one of these machines with power button trouble, the hard part is getting the case open. In my machine the apparent trouble was schmutz blocking a connection. Here’s a side view of the bolt so you can get a better sense for the dimensions, along with the wacky oval-head screw one more time.
Thanks again to Dave H. for making and sharing this little socket. He wouldn’t even accept a pack of capsules for his trouble!
You can borrow a socket if you like. As you’ll see below, various sockets have circled the globe! If you borrow one, you have to send me a picture of your machine’s guts for this page. :) If there’s a queue, you must send it along within a few days. More commonly there is no queue, which means you’ll have to hang on to it for weeks until someone writes me.
You will also need a Torx driver size T-10, it should be easy to buy or borrow locally.
Get a Socket
Buy a socket!
You can buy a tool to extract the oval-head screws on a Jura nespresso machine:
- A 3.5 millimeter, 6 point socket may work. If you don’t have a set
with this size (I don’t either, mine starts at 4mm), try this:
https://www.amazon.com/Wiha-26535-Precision-Driver-Metric/dp/B000O5ILYS/ - A steel oval-head socket is about US$13 shipped, sold by Peter N, the
Jura Capresso Doctor on eBay. This has been used successfully by many people:
https://myworld.ebay.com/juracapressodoctor - Peter N. fabricates his own steel sockets in Greece and sells them for about $10 on eBay:
https://pages.ebay.com/link/?nav/item.view&id=291262252009&globalID=EBAY-US - 1/4 inch bit for oval screw heads from Esprase in The Netherlands,
€6.75 plus shipping:
http://www.esprase.nl/product_info.php?products_id=569” - Oval Pan Head Security Screw Hand Driver, about US$12 plus $8
shipping. I have not seen this tool and cannot promise it’s the
right size. If anyone buys one, please send me a picture.
http://newelectronx.com/proddetail.php?prod=oval-pan-head - Spanner bit (driver) size 10 at Amazon, about US$4 plus shipping, eligible for free shipping. A spanner bit is actually made with two points for driving a security screw that has the matching two little holes on the screw head face. But the tool has a gap between the points that’s just about right for turning the Nespresso oval-head screw! See below for reports and pictures about using a spanner bit to turn the oval-head screws.
http://www.amazon.com/Vermont-American-15442-Spanner-Screwdriver/dp/B000GAQE8Q
Unfortunately the oval pan-head security screw bit is not supplied in any tool sets that I’ve found. For example, these sets from Harbor Freight (links below) look promising, but Gregg L. checked them out in person and reports that the needed bit is not included.
- http://www.harborfreight.com/33-piece-security-bit-set-93388.html
- http://www.harborfreight.com/100-piece-security-bit-set-68457.html
Build a socket!
If you already have your machine on the bench and don’t feel like waiting for a tool to arrive in the mail, look below for some advice on building a tool to turn the oval-head screws. Reusing a part from Ikea seems to be the easiest option.
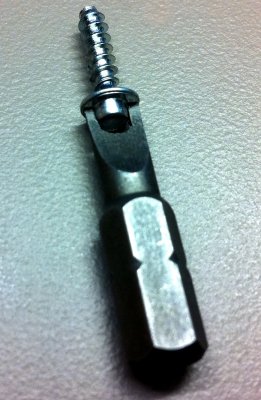
In April 2009 Jakou posted details on reworking a part from Ikea into a socket to turn these pesky oval-head screws. He reused a fastener that Ikea ships with their furniture (see picture at right). This fastener is about 2.8cm (1 1/8 inches) long and consists of two parts: a hollow sleeve plus a matching M4 (metric 4mm diameter) screw. An Ikea store often will give these out on request but sorry I don’t have a part number. The only required tool is a pair of pliers to squeeze the open end of the sleeve. The picture below is straight from his blog.

Read the whole discussion (en français!) at the link below. If you don’t understand French, a Google translation is pretty good. Many thanks to Elvire Serres for sending me this link:
http://www.tout-electromenager.fr/forum_lecture-4775-4-1.html
Also scroll down to see more details about Ikea bolts from Mr. Arenas of Barcelona.
Mico N. of The Netherlands offers this advice to build a metal socket:
What I did was look around for an aluminium object (which can be drilled easily) and would fit nicely in the recessed holes my machine has to get to the oval head screws. Some were recessed 30 millimetre deep. My eye caught this scalpel-like hobby knife holder and it is a perfect match! You can buy these knives in the hobby shop for a few Euros/Dollars. I measured the thinnest part of the oval head screw with a caliper and this turned out to be exactly 3.2 millimetres. Luckily I still had a 3.2mm metal drill in my toolbox so I placed the hobby knife holder in the vise and tried to drill a hole as much in the middle as I could. As you can see from the photo I need more practice to find the middle :-) After drilling a hole into the knife holder of about 5mm deep I moved the drill from left to right in a straight line to make the hole into an oval shape similar to the screw. After a while it was a perfect fit and I successfully used my “tool” and unscrewed the oval heads from my Nespresso machine.
Jacopo L. of Milano, Italy offers this advice to build a plastic socket:
Just take a pen (a Bic is perfect for this job). Pull out the bottom cap and the ink cartridge. Heat the tip of the casing a bit just to melt the plastic and make it soft. Then press the tip on the oval head and wait 30 seconds to let it cool down. Done. Now you have a perfect tailor made oval screw driver!
However, several people have written me to say that they had poor luck with making a plastic tool. They melted several Bic pens but still were not able to turn the screws. So your mileage may vary here.
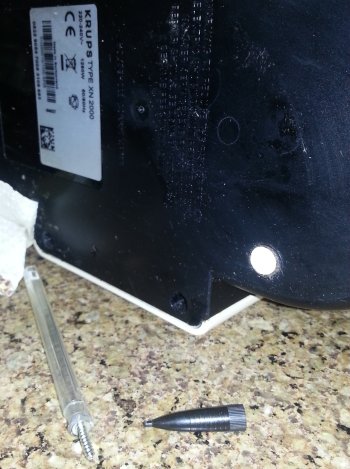
In August 2011 Rolfje blogged with advice on opening a Krups XN2001 machine, read it here:
http://rolfje.wordpress.com/2011/08/27/how-to-fix-a-krups-xn2001-nespresso-machine
He glued bits of metal with a slot to the oval screw heads. The picture is straight from his blog:
Need parts?
Here is a resource.
- Peter N, the Jura Capresso Doctor, sells parts for Jura and
Jura-Capresso machines, at present thru eBay. But since the
Nespresso machines are made by the same Swiss manufacturer
(Eugster-Frismag) that makes the Jura, some of the parts like
internal O-rings may work for Nespresso machines too.
http://myworld.ebay.com/juracapressodoctor
Machine Repair Stories
Below I’ve gathered pictures and stories of machine repairs – some successful, some not. Many machines were opened with a socket that I’ve lent out. :)
If you prefer video over text, here’s 15 minutes of explanation on
opening and repairing a machine:
http://www.youtube.com/watch?v=CDdAWKuCvhA
Stories in 2010
30 July 2010
Dave’s socket traveled to San Francisco, CA to help Thayne N. repair his Nespresso D90. Success!
27 August 2010
The socket returned to SF, CA to help Jim C. fix a loose wire in his Jura Ultra. Success number two!
29 September 2010
Third trip to California, this time to Jen L. in Encinitas. She opened her Essenza and convinced both sets of push-button switch contacts to work again! That’s three successes and counting.
11 October 2010
The socket flew over the pond to Bert van E. in Utrecht, The Netherlands. He got his Krupps Cube open just fine, but the problem preventing the machine from turning on was not obvious. Have to count this one as a miss, unfortunately.
22 October 2010
The socket continued its European journey to Geneva, Switzerland. There it helped Tony T. open his machine and clean the contacts, the same repair that I did some months ago. Success number four! He sent me these before and after pictures of the contact circuit board.
9 November 2010
Back to North America, the socket made its first stop in Canada, where Antoine N. in Montreal used it to open his D100 and re-clamp a leaking hose.
19 November 2010
Fourth visit to California! Bill V. of Northridge used the socket to open his C100 and clean the power switch contacts. His machine’s switch has three wires, a small LED in the middle of the board, and a translucent rubber push button. He reports that it works fine again.
10 December 2010
First visit to England. Tom Q. in Basildon, Essex, UK used the socket to open his Siemens machine. Unfortunately the fault was not in any obvious places like the switches and he was not able to repair it.
18 December 2010
Back to the U.S., the socket visited Illinois, the Land of Lincoln, where Ivan B. used the socket to open his Jura F60.
28 December 2010
Akos B. from Hungary wrote me that he found a simple tool to loosen these oval-head screws. It’s called a spanner screw bit and Akos reports that size 10 worked for him. I bought a size 10 from Amazon. It fits but does not grip the head very well.
Stories in 2011
3 January 2011:
Lost. :-( The USPS ripped the envelope that Ivan used, and the original socket fell out somewhere on the way from Illinois to Philadelphia. Ivan very generously offered to buy one of the Ebay guy’s sockets to keep this little community going.
10 January 2011
Ivan replaced the home-brew socket that our beloved USPS dropped on the floor with this shiny new one and sent it on to Philadelphia.
14 January 2011
Sam G. in Philadelphia opened his C100 and began searching for an elusive leak!

23 January 2011:
Visited Travis E. in Newton, MA. He cleaned his machine’s buttons and they work again!

13 February 2011
First time in Portugal! Paulo P. pried open his machine and polished away the poop that prevented his push buttons from working properly! (Forgive me, Paulo :-)
28 February 2011
Second person in Portugal! Eduardo N. opened his machine and sent me this picture.
7 March 2011
Next stop was Spain, where Manuel L. in Madrid reported finding some metal bits inside the socket that made it difficult to turn the oval-head screws. After some cleanup he was able to open his machine and diagnose a failed pump.
6 April 2011
Third visit to Portugal, where Adão C. confirmed that the socket is a bit damaged but still functional. His machine had the same problem as mine, and after some cleanup it worked again!
1 June 2011
After nearly two months with no requests, David R. of Chicago wrote me to ask for the socket. He sent me this picture and note:
in about 10 minutes the machine was dis-assembled, cleaned, re-assembled!
14 June 2011
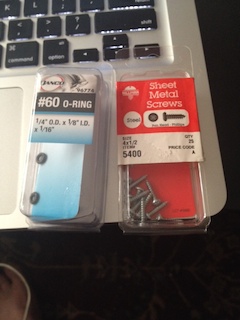
Second stop in Chicagoland to help Gabe S. open and repair his D290 with excellent results. Gabe reports that he replaced the original screws with #6 x 1/2 inch stainless-steel sheet metal screws.
11 July 2011:
First visit to Asia! Melvin P. in Singapore finally convinced those pesky oval-head screws to turn with a little help from some aluminum foil stuffed into the socket. And he helped a friend too. He reports:
I also realized (rather belatedly, after earning a bruised thumb) that the tool works much much better when it is detached from the key ring and used with a screwdriver handle attachment (the blue object in the photo). While the key ring can provide the necessary torque leverage, you really need a handle to provide the needed pressure to keep the bit on the screw head.
12 July 2011
The socket is significantly damaged. Melvin P. sent me this close-up picture. To be fair, the ebay guy does say this tool is for light use only. Melvin reports that he reworked it a little and it should still work.
20 July 2011
Ralph ? wrote me from Cyberspace to say he successfully used a #8 spanner bit to remove the screws in his machine. He reports:
the space in between the prongs on the bit make a very tight fit at exactly the most narrow diameter of the oval. it takes several attempts, much slipping off the rounded head, a very good sense of the axial center of the screw, and a steady hand to get the sufficient friction to get the screw started.
21 August 2011
Gregg L. of Hatfield, PA wrote me about his success with fixing his machine:
Appreciated your suggestions and pictures. Used the idea from Mico N. and drilled out an X-acto handle as described using a number 31 drill bit with no vise, since I don’t have one. Worked perfectly. The Harbor-Freight security bit set did not have an oval head driver and the bi-slot bit did not work even with some filing. Did use the small Torx bit from the set however to remove the top shield to make getting to the buttons easier. Had a right hand button that would not activate. Took it apart cleaned everything with rubbing alcohol and cotton swabs. Reassembled it with 4x1/2 zinc pan head screws (they are a better fit than 6x1/2) from Lowes ($1.25), button now works and wife is happy again.
28 August 2011
George X. in Shanghai, China opened his machine with the socket but had some trouble with the internal fasteners.
24 September 2011
Lawrence Sheed of Shanghai sent me a link to detailed instructions on
his blog for opening a Nespresso Cube (Krups XN5005). The oval
security screws on that machine are not set deep, and he was able to
turn them with pliers. Check out his pictures!
http://www.computersolutions.cn/blog/2011/09/repairing-a-nespresso-cube-krups-xn5005
9 October 2011
Giovanni R. in London, England used the socket to open his machine. He kindly repaired the socket before sending it along.

19 October 2011
Niek V. of Arnhem, The Netherlands disassembled his Nespresso Cube after making further adjustments to the aluminum socket. He diagnosed two blown thermal fuses and replaced them successfully! He reports:
I fixed the Cube yesterday, it was so easy with the right tool! The 2 thermo fuses screwed to the heating element were defective, so I replaced them for €3,50! At Nespresso they asked €150,- for repairing it! To find the problem I started to measure voltage from the connector (230V 50Hz) to the printed circuit board to see if there is a strange value. From the connector it goes first to the on/off switch and from there to the 2 thermo fuses. The values were right (230V) until I measured after the fuse, there was no voltage, then I measured OVER the fuse with an Ohm meter (resistance). It should give a value greater than 0 but it was 0 or OL (infinite resistance), so then you know the fuse has done its work and is broken. So I took them out and read what was on them. My fuses are: Microtemp, Stabln, E5A00 167 C (degree), so I went to the electronics store and bought 2 thermo fuses http://www.amazon.com/Thermal-fuse-167-degrees-celsius/dp/B000T9VESY (they are also available at Amazon). I replaced them, put it all back together, pushed the on button and it worked. The result was a fine cup of coffee!
2 November 2011
Niek V. wrote me about a new socket!
I already told it, the socket is damaged and you need to fix it after a few screws. So I made a new one today and it just works fine. The next one who’s going to need it gets them both so he can decide which one to use.
4 November 2011
Bruce F. of Long Beach, California wrote me about his regular drip coffee machine:
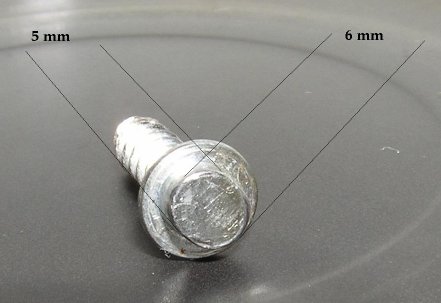
Thanks to your blog, I’ve just been able to open up my Krups 12 Cup Coffee maker model 134A. The 3-max cups switch was broken. There are two oval head screws about 1 inch deep on the bottom that needed to be taken off. I was able to make a similar tool to those that were described, however the dimensions on the head of these screws were 5mm at the narrow side and 6mm on the wide side. Hope this helps someone else.
21 November 2011
Manny C. in Princeton, TX opened his Capresso to fix a leaky hose.
24 November 2011
Diana T. in Los Angeles writes:
Let the folks know that all the advice was great and it worked perfectly. Machine fixed in exactly 10 minutes. We replaced the funny screws with the ones suggested by the blog and now our cat Frankie can get her morning coffee (without it she’s a MONSTER).

6 December 2011
Julie P. in North Wales wrote that she used the brass tool made by Niek to remove the screws on the bottom of her machine. She cleaned the power switch and is now searching for the source of a leak.

7 December 2011
Noel L. from Puerto Rico reports the following experience:
I also noticed that if you pinch the soft button from the outside, and pull it out at the same time, it starts working again. Somehow, accumulated dirt or sulfate is removed by pinching and pulling the button. This is really convenient especially if you are in a hurry and do not have time to uncover and repair the machine. I hope this helps some Nespresso coffee lovers out there.
Second update 25 June 2014 from Noel:
Today, I would like to update the same problem with another experience that will help many friends fix their clogged buttons without breaking apart the machine:
When pinching the buttons do not do the trick, if you spray a small amount of Silicone Spray on the power on and cup buttons, while having the machine at a horizontal position, this liquid will penetrate and reactivate the electric connection again and the machine will start working properly. Silicone acts like a cleaner and conductor and it dries very quickly. I use it also for my stubborn iphone home button and it works better than alcohol plus lasts longer. Although I don’t think the brand matters, the one I used is Liquid Wrench.
Thanks for maintaining this very useful blog.
10 December 2011
Nick H. in London, England wrote me to say:
Unfortunately the aluminium one is pretty chewed up and won’t work. The brass one will not fit either as there is a ridge around all of the screws on my machine and the brass tool is too wide.
27 December 2011
Ricardo R. in Mafra, Portugal wrote me about trying to open his Nespresso xn2001:
Although i’ve already tried to open the Nespresso, but the alluminium socket is very damaged…and the other doesn’t fit…
I told Ricardo to keep these sockets since they don’t seem to be of any further use to anyone.
Stories in 2012
5 January 2012
Dennis van D. in Utrecht, The Netherlands wrote me to report his success with using a #10 spanner bit:
Thanks to Rolfje and your blog, I managed to open and repair the dirty buttons on my Krupps Nespresso :) Since I’m rather impatient, waiting for an envelope with a tool while the machine’s already on the table is not something I’d like to do. Thankfully I saw a tool come along that I had lying around (#10 spade bit), so I could start dismantlement right away. It was a bit finicky with the first two screws, but the 3rd and 4th came out as if the bit was made for it. Thank you for making my mornings a bit less annoying ;)
16 January 2012
Todd S. from Cyberspace wrote me to report his experience with using a screw extractor on the oval-head screws:
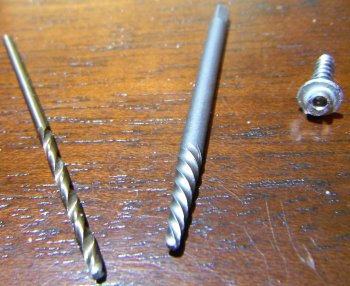
Thanks for your article about the Nespresso machine repairs. I was ready to bust out the soldering wick and get geeky on that thing (it’s the office machine). Alas, the oval screw heads were a surprise. I attempted to make a plastic “tool” using a pen (as someone suggested). Then, it dawned on me that the easiest and cheapest solution was to drill a small hole into the bolt head. Then, I simply used a bolt/screw extractor to remove the factory screws.
While drilling the hole into the top of the slightly-rounded screw-head isn’t too terribly difficult, it does require a bit of patience and concentration. A very simple and durable “helper tool” would be a dowel. Determine the correct dowel size for the holes on the bottom of the case (these were paradoxically easier to drill than the top-mounted screws). Anyway, if you drill through the center of the dowel (which should extend just beyond the top of the holes), you have a jig/guide/etc. It would help the process. Anyway, I used a 1/16 drill bit (smaller is better… but needs to be a size that works with the screw extractor). Don’t “go cheap” on the drill bit – and be certain to use a metal bit (one of the “fancy” coated bits is appropriate, here, as it takes a while to start the hole).
17 January 2012
I confess I still had a tool from Dave H. on my workbench. It was a short, drilled-out bolt with a 1/4inch drive hex socket as its head. The large head prevented the bolt from reaching the deeply recessed screws in my machine, so I put it aside. Today I got motivated to try grinding down the bolt head to fit into the recess, and this is the result. It fits into my old machine!
18 January 2012
Peter N. of Wilmington, NC, the Jura Capresso Doctor, wrote me a long note about
the stuff he sells on eBay for repairing these machines
http://myworld.ebay.com/juracapressodoctor/
I just read your log about Nespresso machines at ..
I’m the “flea-bay” guy you mention :)
Let me give you some more history/input on this, as there is a lot to say:
$40 cost: The aluminum oval head tool was originally imported by me from Germany. The German sellers charged close to $20 for the tool, and a whooping $30 for shipping (!) and to add insult to injury, they refuse to ship to USA, so I had to have the tools shipped to Finland first and have my friends ship to USA adding further shipping costs. At the time I ordered only 4 at a time (due to the cost, and since I did not know if I was going to be able to sell them). Hence, the $40 cost.
$20 cost. After selling a few of the German tools, I decided to see if I could have somebody make them for me. It was expensive to have them made in small quantities, but I eventually found a company that made me 200 of these for $6/each. This is when I dropped the price to $19.95. The markup may seem big, but this tool was originally intended for Jura-Capresso superautomatic owners that must pay Capresso a fixed price fee of $235-$350 to get their machine repaired, and from previous sales I found myself spending a lot of time helping people diagnose problems with their superautomatics.
Unfortunately the first batch of aluminum tools was not very strong (as you note in your blog). The first batch of 200 tools was made to my technical drawings, and the manufacturer apparently was not able to follow it perfectly. This resulted in the tool not sitting tightly enough around the screw head and I had to tweak each tool manually (what a chore!) to make them work. While it worked, it was tedious and the tool was admittedly not very strong. I was ready to give up on this, but last summer when I ran out of tools, I decided to contact the manufacturer and see if they could make the tool and guarantee a perfect tight match with the screw head.
Frankly, I never realized that there is another market for the tool, that does not involve the complicated and overly expensive super-automatics! Had I known that, I would have listed the tool for $9.95 a long time ago and I will definitely make sure to put up a specific Nespresso listing that I continuously will keep at a low price ($9.95 / free shipping or lower).
Peter was kind enough to send me a pair of sockets and screws. I’ll send one to the next person who joins the queue.
19 January 2012
Today an Irwin #8 spanner bit arrived in my mail. As you can see from the picture, the gap between the prongs is simply too small to fit around the oval-head screws that were in my old Nespresso machine. But the #8 has worked for some (see above) so your mileage may vary!
31 January 2012
Mr. Arenas of Barcelona wrote me about his adventures at Ikea, adjusting the bolts and repairing his machine:
This morning I went to the Ikea Store, customer service area. I showed them the photo, asked me where it belonged to, I said I was not sure because I was doing a favour to a friend. They asked a guy from the warehouse to come over and see, he had a look at it and asked me, “how many do you need?” I said 4 units and in 3 minutes I had them for free, at no cost!
It’s just perfect that these bolts have a Philips head, in one hand, you don’t need to attach the bolt to another piece in order to make a handle. In the other hand, the Philips head allows you to use all the force/power you need to unscrew the limed stuck screws. And finally, this bolt perfectly fits the hole for the “Radio shaped” Nespresso type machines like Krups XN2001, etc.
Tuning was made with some robust pliers. I pressed each bolt following the way of the slot in the bolt. This way is easier for the user to know where the narrow part of the oval head is. I pressed each bolt half way in the plier, otherwise it can’t be pressed, it’s too hard (or I’m not strong enough!) Once each bolt has been given the desired shape, I used this other plier to lower the inner part of each bolt, otherwise it would not perfectly fit the oval-head screw. Also, I could have be used a Dremmel instead, but once again, I did not have that “so necessary” thin drill.
Philips screwdriver is a MUST, otherwise the head of the bolt will be damaged. If a short Philips screwdriver is used, then it’s much better because it gives you a much better control. When using this bolt, you must press it very firmly against the oval screw with the screwdriver, and do slow wrist rotations, relaxed, just like if you were opening a safe, otherwise the oval-head in the screw may be damaged, and the whole thing would turn into a big problem.
Typical lime in the button board after 6 years of daily use. Needless to be said that I cleaned it with some cotton and alcohol. Yeah, I had an additional problem. The board was dirty, but the conductive part in the sillicon button was completely gone, so after cleaning it no way I could switch on my Nespresso! Ok, in order to bypass this situation, I used a piece of aluminum foil and glued it to the button. This is just temporary, but it works.
I changed all visible screws in my Nespresso machine (10 in total). I DO recommend everybody do it. This kind of oval-head (in the screws) will go on getting spoiled each time they’re screwed-unscrewed. These type of screws were created as a protection for appliances, but as a screw in itself, they’re not efficent, and when unscrewed, they should not be used again.
Mr. Arenas kindly made extras for others to use!!
8 February 2012
One of Mr. Arenas’ sockets went to Bruno T. in Lisbon, Portugal and he wrote me to report an easy victory:
Just got the tools from Mr. Arena and in 5 minutes got my problem solve :). Please confirm that it’s to send it back to you or you have someone new in queu.
Bruno also pointed out that the circuit board can be removed without pulling out the rubber button.
10 February 2012
Well, this is a first :) Lee A. of Brooklyn brought his Nespresso machine all the way to my place in New Jersey, and using one of Peter N.’s sockets we opened it quickly. The screws could be turned pretty easily with just the supplied key ring, but we soon switched to turning the socket with a regular screwdriver-type tool holder for a bit better control. His machine is modern and has a regular toggle switch at the back to turn the power on and off, but still uses soft push buttons to start and stop the pump. Anyhow, the easy part is over; now Lee has to hunt down an elusive internal leak.
12-12-12
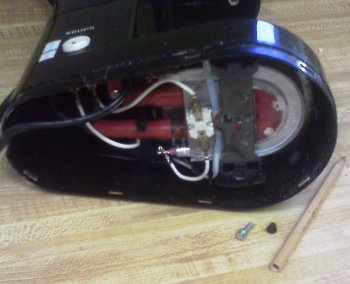
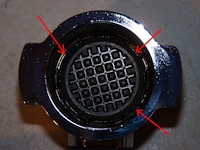
Lee wrote me about his adventures in replacing a leaky plastic elbow joint, which is circled in the picture on the right. The two wide, flat openings on the side of the joint are for retaining clips that grab the O-rings inside:
My apologies for the extremely delayed response! Here’s the final result of my Nespresso project. I coated the broken one with epoxy and duct tape and it temporarily fixed the problem. Then Peter ordered me a replacement part which he then had to wait many months to receive. I put on the part but there was leakage problems so he sent me some replacement gaskets and some kind of water sealer/lubricant which I put around the gaskets. Now everything is fixed.

14 February 2012
First repair in Africa! Patrick d’H. in sunny Cape Town, South Africa opened his machine using the old steel bolt that I ground down so it would fit into the plastic wells on the bottom. Maybe a reader can help him, because I do not know the answer to his question:
The issue I had was the following: it was starting normally (warming up). As I push the pour button, after one second it switches off completely the machine. Would the problem comes from the switch?
25 February 2012
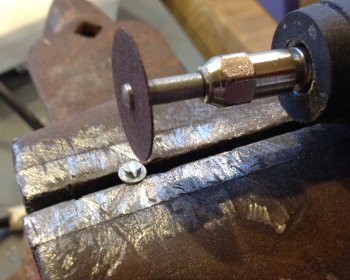
While goofing around at the workbench this afternoon I experimented with cutting a slot into the head of an oval-head screw. I used a dremel tool and a thin cut-off wheel, it was a bit of a challenge to hit the middle and keep my hand steady. I think the result is pretty good: a small screwdriver fits very well in the new slot. If you have to work on one of these machines, this can save you the hassle of running around to find replacement screws, and it will be easy to reopen the machine!
28 February 2012
Robert S. in San Diego, CA sent me this report about repairing his Nespresso Model C machine.
Babka and Duka could not use their Nesspresso machine. The symptom was the power on and off button took more and more pressure to turn on the machine. The fix was to wipe both pieces of the switch with a clean Q-tip with 91% alcohol. I wiped both on/off and start/stop since I had it open. I replaced all 8 screws with stainless steel #5 Phillips Pan Head screws 1/2inch long. They can be ordered from McMaster.com if they are not available locally.
Robert, Nesspresso cafe lover, Nesspresso security screw non-lover!

10 March 2012
Wim B. in London, England dropped me a line about using the old steel bolt:
I did indeed receive it; opened the machine and only had to clean the sensor with a piece of cloth and it worked again. Changed the screws for normal ones and we’re very happy with it.
3 April 2012
Donnchadh M. in Hasselt, Belgium sent me this question about her machine:
I recieved the opening tools today and got my machine open, thanks a million. .. The machine itself has problems pumping water when theres a capsule inserted but flows freely when theres nothing inside. I cleaned everything and reseated all pipes but still seem to be a weak flow so i am not sure what the issue is?? But at least i have it open and we can see further if theres a fix.

11 April 2012
Dave W. from Lake Worth, FL wrote me with some advice for using a screw extractor to remove oval-head screws:
After Nespresso told me it would be $125 to repair my C90 I started googling, and I found your blog. An hour’s work with a drill and a screw extractor, and I had the machine open.
For the screws in the shallow holes I just used a pair of small pliers, and was able to grip the screw heads. I wasn’t able to fit the pliers into the deeper holes, and had to use an extractor.
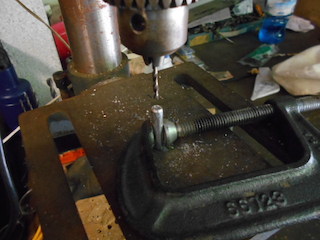
I used the smallest screw extractor I had. I believe I got it at Harbor Freight, but you can also buy them at Sears and most hardware stores. They come in sets. Normally you use a left-handed drill bit to drill the hole, and often the drill bit itself will bite and spin the screw out, but I had broken my 1/16inch left-handed drill bit, so I used a regular right-handed one. Because these screws are in there with such low torque you only need a very shallow hole for the extractor to be able to get a bite and turn the screw out. In the attached photo you can see the drill bit, the extractor, and a screw with a very shallow hole in the head. I used a cordless drill and a steady hand.
I cleaned the switch, and the machine worked perfectly! Eight #4 panhead screws and it all went back together. Thanks so much for this resource.
15 April 2012
Jorge S. from Lisbon, Portugal says:
Here are a few pictures of the stripped down Krups. Unfortunately I don’t think I was able to solve its issue, as even after a full check-up and cleaning it still resists to warm-up, the leds keep blinking nervously when we turn it on… Maybe it’s just time for a replacment.
1 May 2012
Fausto P. a.k.a. MrWho from Coimbra, Portugal wrote me to report:
I’d like to thank you for sharing your tips on opening up a Jura (here it’s a Krups) Nespresso Machine. I succeeded using the melted BIC pen trick - worked perfectly, cleaned the power button and closed it up again with normal philips screws. Not bad for a €10 machine I bought from a friend who replaced it with a new machine.
7 May 2012
George C. in Honolulu, Hawaii wrote me this note:
Aloha. Received the magic socket from Jorge in Portugal on Saturday. Spent Saturday afternoon dismantling my machine and chasing down the leak, which appears to be coming from the extraction unit. I suspect the tiny little red washer, although it appears to be in fine shape. Note that as others have mentioned the original machined bolt no longer grips the sides of the oval screw heads, but the “keyring version” works perfectly.
6 August 2012
Dave W. from Lake Worth, FL wrote me again, this time to explain how he replaced the recalcitrant soft-touch button in his Nespresso C90 with a more reliable button:
I wrote back in April to say I had used a screw extractor to fix my machine. After a few months it began to fail again, and the time between wiping the power button got shorter and shorter. So I replaced the button with a real button. Search for “B006WRNTA8” on Amazon, to see a SPST momentary push button switch that fits right in the hole of the C90. I unsoldered the original circuit board and rubber switch, and soldered in the button. Now it works great, every time. See attached pictures.
6 September 2012
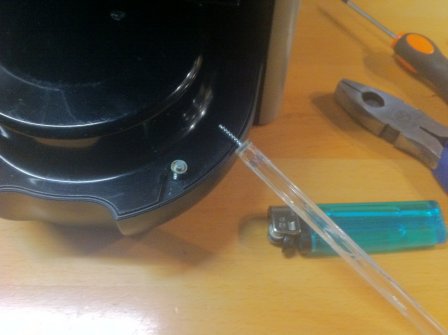
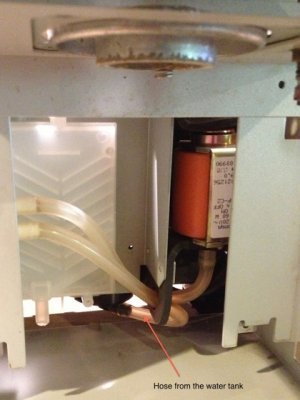
David A. from Atlanta, GA sent these directions for unsticking a stuck check valve.
My machine was not priming, so no water would flow from the tank to the rest of the machine. The pump is a simple diaphragm pump, with check valves to make sure the water only goes in 1 direction. Think of the check valve as a cap at each end of the pump with a spring to hold it in place. When the diaphragm is pushed in the flow direction, the water pushes past the caps (and the springs compresses a little bit). When the diaphragm moves in the non-flow direction, the caps prevents the reverse flow of water. In my case, the input cap was stuck. Unfortunately, the pump Nespresso uses can’t be disassembled, but there is a workaround.
To repair a stuck input check valve:
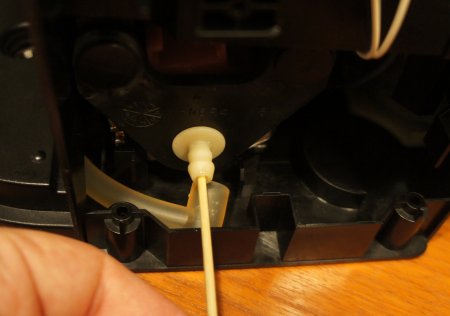
In addition to the screw removal tool (I used a spanner bit), you need a bamboo skewer (see photo) or something similar. Remove the two screws from the bottom of the machine holding the left gray cover on. Pull the bottom out, the top of the cover it latched to the machine.
There is a yellowish clear tube running from where the water tank sits to the input side of the pump. Pull it off.
Insert the bamboo skewer and push gently to depress the check valve.
Put the tube back on and test. If you have success, reassemble the cover.
26 October 2012
Fellow New Jerseyan Paul S. of Randolph stopped by my place to grab a socket in person. He sent me this note about restoring marital bliss :)
Thanks for the use of the tool. I opened my C90 up no problem. I cleaned off the connections on the power switch with an eraser, and replaced the “screws” with #4 1/2 inch zinc screws, which fit perfectly.
Everything seems in working order now and my wife can finally turn the machine on by herself.
12 November 2012
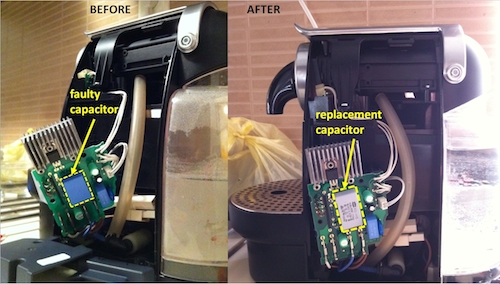
Enzo from Turin, Italy reported his success with repairing a malfunctioning machine by replacing bad capacitors. He writes:
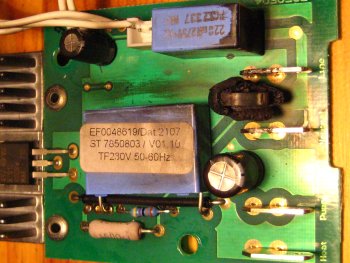
I’m writing you from Turin (ITALY) because I think it could be usefull for your blog readers to know how to repair their Nespresso coffee machine when it doesn’t works because of the “mad blinking” like happened to Jorge S. from Lisbon, Portugal (15 April 2012 post). I had the same problem and I totally fixed replacing two capacitors (the blue squared capacitors) on the circuit board. It seems that this capacitors are used as filter for the main supply, but after a while they have some loss and the machine LEDs begin to flash quickly and there’s no way to prepare a cup of coffee… It will cost a couple of dollars (even less) and the machine it will work like a new one!
The replaced capacitors are the two “blue boxes” in the picture. The value of each varies from machine to machine (every make use a different one… here in Italy we can have KRUPS and De Longhi machine) but is printed on every capacitor. In my case (KRUPS XN 2105) one was 220nF (nano Farads) and the other was 680nF. Pay attention to use the same kind of capacitors (X2 MKP 275 VAC).
24 November 2012
Susy P. in Vevang, Norway opened her machine only to discover that the pump had failed, and the price of the new part was ridiculous. She reports that she jumped at a deal from Nescafe - buy 15 boxes of capsules and the machine is free! I’ve never seen that sort of offer in the U.S.
30 December 2012
Mário P. of Portugal sent this advice for making a tool from a plastic pen shell:
Found your blog entry through Rolfje blog and solve my Krups XN2001 buttons problems in a hurry! I’m just writing to show you the solution I made after trying the first time with the BIC pen… So after unscrewing just two screws it was broken… The platic walls were thin and with little effort they brake.
So, using a soldering iron I heated the front of the pen and spread the melted plastic to block the pen so it would have a lots of plastic on the top. After, with the plastic moldable, I press it on top of a oval screw and let it cool off.
This way I managed to get a stiffer socket that has the exactly shape of the screw head (picture attached).
Thanks for this awesome compilation!
Stories in 2013
6 January 2013
Cathy L. of Phoenix, Arizona easily used a plastic pen case to remove a set of oval-head screws:
I was able to remove the oval screw from my Krups Brewmaster Jr. 170 by using the BIC pen method. I didn’t need to heat the pen. I just used the tail (non-writing) end with the plug removed and pressed it firmly against the screw while I turned it. Now, on to fix what appears to be a pumping problem.
7 January 2013
Jose L. D. D. of Barcelona, Spain hit the all-too-common problem of a dirty switch that prevented his machine from turning on, but his machine has torx screws in the base. I don’t know whether Jura is giving up on the goofy screws, or if the factory just ran out that day and substituted whatever they had. Anyhow here’s the picture.
20 January 2013
Andrea W. in London opened her machine with the well travelled socket and cleaned her machine’s troublesome switch.
30 January 2013
Michael K. in Miami, Florida wrote me a sad story about mold in his Nespresso C-100.
First of all thank you for your effort in keeping this blog up. Being only semi-handy I look to the net for advice like this. Great job. I returned from a few months away to some absolutely disgusting coffee and a moldy smell in my machine. Descaled twice, flushed with boiling water and baking soda, boiling water and vinegar and lots more boiling water. No luck. Two calls to Nespresso (total of 40 minutes on hold) to be told there was nothing to do with a 4 year old machine but replace it. Ordered a new one. Got it. Still curious about my mold problem so I decided that even if I had to break it open I wanted to discover the problem.
FOUND YOUR BLOG- THANK YOU.
The melted pen worked on all but one last screw so I broke the last side panel off and started unscrewing everything I saw. When I yanked the front nozzle off I found the problem. YUK!!! Not very happy about the last few coffees I drank anyway. YUK, YUK!! I’m certainly not an engineer but as far as I could tell from looking at the construction of the machine there should not be any water where I found the mold.
You can call this one a success since I got it open (beat the evil oval screws) and discovered the problem. This was more of an autopsy rather than an attempted repair. I can’t imagine how long the hold time with Nespresso will be to make a complaint, considering I waited 20 minutes to buy a new $200 machine.
By the way, if you are replacing an older machine they give you a $49 discount. Only found this out on the second call- the first person didn’t offer it.
2 February 2013
Jose L. D. D. of Barcelona, Spain wrote me again, this time about a second repair that he performed. I think he is now an expert :). And I quote:
A relative brought me to learn yours, with the same problem, so I tried. But if wearing this special screws.
I’ve got no problems but in a different way to explain what has happened and how I did it.
Once again I remind you that I use the Google translator, so if something does not understand or is not clear, let me know and I repeat it without any problem.
I go:
The first thing I noticed is that the screws are different. Displayed on your site about the oval measuring 5 mm x 6 mm, but this machine has an oval 4mm x 3mm.
I’m not counting the failed tests I’ve done, but what inspired Mr. Arenas explained as he tried to do, with a screw IKEA, but it was great for my screws.
Then I remembered that I had around a brass tube inner diameter of 5mm and decided to try that. Just squeezed with pliers to shape and within minutes I got.
The only problem is that as the tube is 5 mm, the oval is left is 6mm x 3.25 mm, but just press a little “side” to use it and that’s it. I send you a picture for you to understand better. Ideally, keep trying until you gradually adjust
Not quite perfect but made in minutes and above …. works.
The brass tube I bought years ago at a store of aeromodelling.
3 February 2013
Martin G. of London, UK wrote me a nice note about his success in repairing his machine.
Thanks for a fantastic blog!!
As you might have guessed, my machine broke down today, and I was stuck on how to open the thing up. My M 190 Magimix nespresso machine had just stopped pumping.
I decided to make my own tool - so I used an old Ikea spacer (as you said), and it worked! Then it was only a loose tube that needed reseating. Success! Only cost me an evening fiddling around. The hardest thing was squeezing the Ikea spacer into just the right shape.
I can’t believe they put these screws in!
14 February 2013
Shai A. of Herzeliya, Israel (first socket visit to Israel!) wrote to say that he opened his machine with the socket but has not yet found the problem.
16 February 2013
Alex F. of Saint-Martin, French West Indies sent me a note and a picture about his experience repairing his machine, which seems to have a burned-out part on the board.
I woke up this morning and my nespresso C90 didn’t want to come on. When I shake it, I could ear a part that was disconnect. Thank you so much for your blog!! I made the tool with the bic pen first. It was good for the 6 oval screws below. When I saw that the red switch was in perfect condition, I decide to open the rest to see where this little round part was coming from. To unscrew the 2 oval screws from the top, I fabricated a spanner screw bit out of a regular flat bit by cutting with a grinder. Then, I pull out the plastic cover in front of the main board, to realize that it’s completely burn.
I don’t think it worth replacing it. I will still look to see if I find one on the internet.
4 March 2013
Oscar M. of Portugal sent me a picture and this short note about his Krups machine:
Thanks for your blog. I opened my NESPRESSO in 5 minutes, cleaned the power button and reinstalled the button rubber. I’m another Portuguese using the melted plastic pen.
19 March 2013
Alvaro G. of Malaga, Spain sent me a note about blinking lights on his Delonghi machine that refused to make coffee, including YouTube videos showing the symptoms:
The problem? My Nespresso is not a KRUPS, it’s a Delonghi model EN 95.P. It’s similar to the referred by Diana T in the 24 November 2011 quote. But mine has two green buttons (small & big) and the on/off is on the back. My problem is the blinking green lights, not the “dead” on/off button (that I don’t have in the same place… )
Videos showing the bad symptoms:
Video 1: http://www.youtube.com/watch?v=gJopqKtR85c
Video 2: http://www.youtube.com/watch?v=uMcUcWyleIs
Video 3: http://www.youtube.com/watch?v=cF6QkJ_JEfk

28 May 2013
Alvaro G. of Malaga, Spain wrote me again with happy news about his machine:
Thanks to Enzo of Turin (update 12 Nov 2012) for directions and email help! Less than 3$ fix !! I replaced both capacitors on the machine board. The big one is rated 680nF and 275 volts, marked “680nM275V-X2” and “PCX2337 MKP”. The small one is rated 220nF and 275 volts, marked “220nM275V-X2” and “PCX2337 MKP”. Both found on eBay with that information. Also available on Aliexpress.com but at a higher price. So thats it. Before blue color. After yellow.
The seller shop from where I bought the items (10 piece minimum) is
http://myworld.ebay.com/2012topdeal
and I have 9 of each
available … if someone needs them I’ll be glad to give them away :)
Video Working machine again: http://youtu.be/mj8E97SQ1Og
29 May 2013
Received a stainless-steel socket from Peter Nielsen. He wrote:
I finally got my supplier to manufacture the tools in nickel-plated stainless steel! It required a big order and investment, but at least I can now supply proper tool bits the way I think it should have been done way from the start. These are going to sell for only $3 more, or $12.95, and will probably last “forever” unlike the $9.95 aluminum tool that sometimes is toast (or at least requires adjustment with pliers or a hammer) after a few uses.
It would be great if you let at least one of the tools circulate so that we can see how long-lived the steel version is. I expect it to last a lot longer than the aluminum version.
13 June 2013
Mark S. of Metuchen, New Jersey used the new steel socket to open his Nespresso professional (!) ES80 machine, which was having flashing-light problems. There’s a picture of the very long oval-head machine bolt he had to remove. Mark wrote:
I was able to extract all but 2 oval screws. Try as I may, I couldn’t get 2 of them to turn without the driver slipping off. Still, the last two are inside and underneath the bottom plate. There may be enough room for me to get a small vice-grip on them to get them turning. If not, I may drill and extract them.
I think I found the pump, but it doesn’t appear that I’m able to descale its insides. I may have to re-assemble it and resort to again following their ineffective descaling instructions. I have to descale the thing every 2 weeks. It has not been properly descaling. I go through the descaling process, carefully following the instructions. The flashing descaling lights then re-set, but start flashing after 2 weeks, and the coffee begins to taste bitter, again. I know it’s not defective lights, because when the lights flash, the coffee also begins to taste bitter. After descaling, the coffee is once again, smooth and full tasting.
I thought that by taking it apart, I’d be able to descale the inner tank, etc. Turns out there may not be an inner tank. The pump may be also the heating chamber. I may have to find a way to get inside the pump.
20 June 2013
Ted V. in Thunder Bay, Ontario used the latest stainless-steel socket from Peter Nielsen to open his machine and sent this note:
The tool arrived today (thurs, June 20). Machine opened with ease
Found the cause of the leak. A cracked coupling. Has anyone ever had this problem? Can I buy a part? In the mean time I experimented with a few epoxys and couldn’t get enough strength. I took a washer and epoxied it to the face of the cracked/repaired connector. It seems to have given me enough strength. I still may order a new part as security. I also used different screws to put the machine back together.
Update 18 August from Ted:
My repair job on the coupling didn’t work but Peter the nespresso doctor sent me a new part and my machine is working great.
25 June 2013
Christophe M. in Toulouse, France fabricated a bit to open his Krups XN2120, and then repaired it with capacitors from Alvaro G.! He explains:
I found your blog a few days ago while looking for information on how to open Nespresso machines ; and especially their very odd screws. For the record, I tried the bic trick that worked for 2 but my hapiness stopped when I melted th pencil badly in the third cavity. I then decided to for something I can easily do with what I had. I came up with another variant of the tool (I attached the picture, as I’ve not seen something similar). It’s made out of a standard bit , nearly plain octogonal, in which I grinded a slot of about 3mm (damn, you’re probably in inches so the shorter dim. of the oval).
Update 24 July from Christophe:
A quick word to let you know that my machine is up and running again :-) Thanks to your blog and especially to Alvaro whose capacitors are doing a great job !!
21 August 2013 Ray K. from Denville, NJ wrote to ask
for advice on diagnosing his machine’s pumping problem:
From another Jersey boy.
I have a D300 which I put into storage in my cellar about 5 years ago when I got my first Keurig. Did not have room for both on my counter.
My interest in espresso machines was recently revived. I brought it up from the cellar and was unable to revive get it to pump water, even after calling Nespresso. They no longer sell or repair this great model. They few tricks they had me do were to no avail.
So, being an engineer I was determined to get inside the machine and see what was wrong. I was really stumped by these oval looking screws and searched high and low on the internet for help. I finally came across your blog after googling “nespresso tools.” At last – some enlightenment as to how to open the machine. Bought the key-ring device from Neil of ebay for $12.95. It worked great.
I ordered the machine and now am stumped. All connections are solid and the hoses are tight, but the machine will not draw water from the reservoir. It stays in the first few inches of the clear feed tube. There are lots of hoses, some for the stem operation.
11 September 2013
Craig S. from Rimini, Italy sent along his success story about repairing his machine’s pumping problem:
I found your blog whilst searching the internet for advice on fixing our Nespresso machine. Thought you’d like to know that I managed to open it up using the BiC pen method that a couple of your readers had suggested. I couldn’t believe how easily the melted pen unscrewed the very first oval screw on the machine, but then the plastic of the pen broke on the second screw. Pen number 2 broke quickly as well, but by pen number 3 I had gotten the ‘knack’ and managed to dismantle the machine no problem.
I fixed the ‘water-not-drawing’ issue by forcing air and then water into the drum thing (which I assume is the pump) via a syringe. See attached photo. Fortunately the point of the syringe fitting perfectly into the rubber seal and I first forced air in which cleared the opening. They I pushed in water and then pulled it out again using the syringe. Did this a few times. All working fine again now and my Wife can now take the machine to her office, which is why I dragged it out of ‘retirement’ in the first place.
23 September 2013
Jonathan L. from Los Angeles used the steel socket to open his D290, but a solution to its blinking lights eluded him:
Here’s a pic of the D290 circuit board. I tried replacing the blue and white caps but neither fixed the problem. It still either flashed all lights during startup or just wouldn’t start up at all. Thermal fuse passed a continuity test. Giving up and either buying a used D290 on eBay or upgrading to the Delonghi Lattissima Plus. But glad I gave it a shot!
26 September 2013
Markus H. from Mainz, Germany sent in this advice about repairing Nespresso buttons:
I find it worth mentioning, that The black paint at the back of the silicon buttons is graphite. I used graphite spray to renew this and the buttons worked like a charm again.
10 October 2013
Frank van B. from the Netherlands sent me a note about sources for information and parts:
I found your Jura blog when I did a search for a Krups Nespresso eachine and I enjoyed reading the whole thread from 2010 on, it’s great and much appreciated ! Since the patent has expired the Nespresso cup machines have become more popular in Europe as now coffee cups from other brands are available and often way more cheap as the Nespresso ones, some of these newbie coffee cups do very well here.
I’m from the Netherlands and find it a challenge to solve problems with goods that seem to be designed to be replaced after (minor) errors and the Nespresso coffee machines are one of these, a repair costs at least 75 euro and at that same price (or even less) a new machine can be ordered online, what a waste of money and good materials that is as they mostly end up in the rubbish !
During my searches for parts and manuals I found a couple of interesting sites and for the blog this English source is a good start for parts and a workshop manual that few have access to:
http://www.buyspares.co.uk/krups/coffee-makers/catalogue.pl?shop=krups&path=561166
9 November 2013
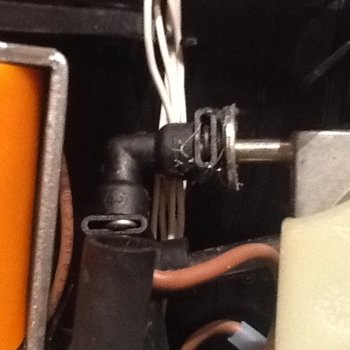
Cam B. from western Canada sent a picture and story about a failed temperature sensor:
I am dealing with a [flashing lights on machine] issue at the moment. What I discovered in my unit (careful application of the #10 spanner got mine open) was that the epoxy holding the temperature sensor in its brass housing (threaded into the thermoblock) had expanded over time and broken one of the wires.
See picture. That little glass bead is the actual sensor. It was potted with some epoxy into the brass housing, which was then threaded into the thermoblock/heater unit in the machine. It looked like the epoxy had expanded over time, and in doing so had broken one of the wires to the sensor. I guess the way the controller works is if it doesn’t ‘see’ a temperature change - hard to do with out a working sensor - it shuts the unit down and blinks an error code.
Working now on trying to source a replacement part. Lots in Europe apparently, but the 52euro shipping is a bit of a pain.
Thanks for putting this info together. I found a similar site in France where ‘magimix m200’ users were sharing repair stories. They had electrical and water flow diagrams as well. People really love their coffee, I guess.
22 November 2013
After six weeks en route the steel socket finally reached Ricardo V. in São Paulo, Brazil who wrote:
Look at the beautiful thing that just arrived (“Just”). Customs + Post here s**ks ..
Here’s some photos, after the long way traveled by the tool. Thank you so much, I’m still trying to believe this internet power.
28 November 2013
Kelly B. from Fremantle, Western Australia shared a picture and story about repairing her machine:
Thanks for your Blog. It inspired me to make a tool out of a split pin. It was nice and soft so easy to drill out. My supervisor tried to get a tool and we’ve waited for weeks. Now I can replace the damaged cord and get it back in use. Thanks.
28 December 2013
Jean-Paul G. from Dampierre en Yvelines, France made his own socket and sent me a picture of it:
Today I had a very good read at your topic on this subject. I had dismounted my Krups XN 2105 a few weeks ago. I did that by using a bolt in which I have drilled an ovalised hole. It worked pretty well. However I had not diagnosed the trouble I was facing, as the machine had been working in an erratic way. The green lights were blinking but sometimes I was able to make a cup of coffee. I tend to believe that the capacitors could be causing the troubles as explained by Enzo of Turin and Alvaro G of Malaga. I understand Alvaro G still has capacitors to offer. Could you please pass him my email so that we can be in touch.
Stories in 2014
4 February 2014
Pierre V. from Belgium sent me a picture of his Magimix M100 circuit board with a burned capacitor, unfortunately I had no answers for him.
My name is Pierre and I mail You from Belgium. Thanks for Your blog about repair a Magimix M100, it was really helpful. I have an other question : I open the machine and pull out the electric print, and there was a piece burn out, know You the value of this piece so I can replacing? I put a photo with. Is It also necessary to replace the two resistors (blue) and above all what can be the reason of this defect?
23 May 2014
Sasha L. from Israel wrote me to ask about a part:
Thank you for repairing blog of JURA coffee maker. I bought this Oval head key Repair Tool ant it is perfect and cheap: http://www.ebay.com/itm/Oval-head-key-Repair-Tool-for-Jura-Krups-AEG-Nespresso-/181305075389?pt=Small_Kitchen_Appliances_US&hash=item2a369fe6bd
maybe you can help me with buying this part which I can’t find… or maybe you can tell me which wire goes to the switch and which to the led?
25 May 2014
Onno M. from The Netherlands dropped me a line about his experience repairing his recalcitrant Nespresso buttons – remarkably similar to mine :) – and I’m happy to add a link.
http://www.glowbug.nl/oddsNends/KrupsXN2001.html
3 June 2014
Dušan M. from Brno, Czech Republic completely reworked his ES 80 machine’s switches and sent me details about the result.
thank for many helps of your site.
My story : To first is thermosensor failed. I make new with NTS 100 kohm/25C. By repairing i make shortcircuit and circuit board fired up.
Now i had free hands to make anything…. I going back in to years 1990’s and make the Nespresso with “hand steering “. Only new pieces :
On-Off button for 1. heat circuit with thermostat 90 C
Control light
On-Off button for Pump/Kofee
On-Off buton for 2. heat circuit with 120 C Thermostat for steam
It’s all. Now is machine ready for long, long time.
23 June 2014
Brenda C. from Chicago reported success with her repair of a Citiz+Milk:
First of all, thank you for posting all of your repair stories to your blog. I would have never attempted to fix my machine without reading everyone else’s experiences. I can’t stress enough my appreciation.
Here’s my update:
A friend of mine was going to toss out her Citiz+Milk machine and I took it instead to see if I could do something with it. The espresso machine made noise like it was working but it was leaking from the bottom of the machine. Nothing was coming through the top. I started my project to locate the leak by trying to take it apart. I found your blog immediately when I attempted to get those evil oval screws off to no avail. Wow. Was that annoying.
I used the bic pen trick and three pens later I got all the screws off. I manhandled the rest of the machine to get to the guts of it and found 2 parts totally cracked, the “elbow fluid connector” AND the “air valve apd cpl mount” (the air valve is pictured below). Here is some good news and bad news: Both parts are available in the UK via buyspares.co.uk and partsmaster.co.uk (yea!), the elbow is available for shipping to the USA, HOWEVER the airvalve is ONLY available for purchase by EUROPEANS (wha???). Seriously. In my case, I have a friend in the UK, shipped the parts to her and she brought them with her to the US on her last trip home and delivered them to me. (Yes, I know this is impossible for most people, but I wanted to share this story anyway). I tried to find a work around to get something shipped over here, but I never found an option other than the “I have a friend in europe” scenario.
I replaced the parts and threw out the other ones, but still had a leak. Turns out that each part has an o-ring at the connection (some red, some black) and I didn’t see one of them attached on the damaged part and I threw it away without checking closely. That was pretty dumb on my part. Instead of paying $15 to ship an o-ring from the UK, or wait until Christmas for my friend to come back home, I found a replacement at HomeDepot (pictured below). HomeDepot did not have silicone o-rings (I think silicone o-rings are red and are more high temperature resistant), but so far the regular black rubber is doing the job on the elbow connection, also, the size should be metric, but the imperial ones fit fine and are not leaking. Lastly the #4 sheet metal screws to replace the Evil Ovals works very well also.
All fixed, not leaking, and delivering delicious coffee!
To sum up:
Pro-tip: Hold onto all damaged parts until you are absolutely sure you’re done with them - inspect all damaged elements for additional working parts that you might need.
THANK YOU AGAIN!

21 July 2014
Joe M. from cyberspace sent this note:
I was just looking through your blog on deconstructing Nespresso machines, and just thought I’d let you know that I’d had great success using a Dremel with a thin cutting wheel, and just converting the screws into flatheads. It works well, and allows for reuse without having to replace the screws. If thin enough a file could also be used.
9 August 2014
Demetrios B. from Cleveland, Ohio sent this question that I was not able to answer:
I have a Nespresso D290 machine that has served me admirably for several years. 3 days ago the yellow light began blinking and the machine would no longer brew. After several attempts of pushing the on and brew buttons simultaneously I was able to get the machine to power on and I descaled the machine. It worked for the rest of the day but was making an intermittent clicking noise. I turned the machine off, but have not been able to get the blinking yellow light to stop. .. I have partially disassembled the machine and the capacitors look good. I would like to test the thermal fuses but coul use a real disassembly manual. Can you help?
27 August 2014
Luke R. in Auckland, New Zealand wrote to borrow the socket and get capacitors:
I have stumbled across your blog on the Jura made nespresso coffee machine! I have a flashing light issue where the lights blink continuously and I can not get the machine to respond to anything … Now I can’t for the life of me remove these screws and I was wondering if there was one of tools floating about that could be posted to me here in New Zealand? … Also Avaro mentioned he had some capacitors available, how could I get in contact with him?
Ricardo V. sent the socket and Alvaro G. sent capacitors, thanks guys for your quick responses! After a long, long trip down under, on 28 September Luke wrote again:
The socket arrived this weekend! I have now opened my machine and much to my delight their was no water damage in sight! … I am now trying to work out the issue, I have 2 thoughts, possible air block in the system ( but then again this wouldn’t cause my lights to blink) … Orr the capacitors, so I will await their arrival and get them changed!
On 18 November I got the good word:</P>
This is perfect timing, after a long wait on parts I finally fixed up my nespresso this Sunday and all is back together! I shall post the tool on to Chris D in the UK tomorrow morning and will also send over my before and after shots of my fix to you Chris L! I will also include the two capacitors that i replaced on my nespresso machine with similar flashing light issue in a hope that this speeds up Chris D’s repair. (very easy soldering jobby).
29 August 2014
Vic from cyberspace shared instructions and pictures for fashioning a tool from an X-acto knife handle:
I fashioned the tool from an X-acto knife per instructions found on your blog. I enclose photos. I was able to open the C90 and test it. Found no obstructions impeding water flow so conclude that the pump must be failing. Importing a replacement pump from Europe would have cost more than the $99 Inissia from Nespresso. So I bought the Inissia. Their service department was very helpful and tested the unit with me over the phone. They came to the same conclusion. Their recommendation, surprisingly, was to keep the unit since it still worked but just took longer. I bought the new unit anyway; I didn’t want to run the risk of being without my espresso for a number of days.
Here are the steps I followed in making the tool: Use an xacto knife with a slim handle. It must fit into the screw hole. If the tip of the handle is curved, file it down flat. It helps to use a vise. See photo. Drill a 5/32 in. hole in the center of the handle–mine was not exactly in the center; no matter. It helps to use a C-clamp and a drill press. See photo. Use a hammer and tap lightly on one side of the hole and then the other to change the shape of the hole from a circle to an oval. See photo. Test the tool. If the fit is not right keep hammering a little at a time until the tool fits. Don’t try to adjust too much at one time. Be sure to remove the blade before using the tool.

3 September 2014
Stefanos in Athens, Greece sent me a happy story plus a picture about repairing his madly blinking machine:
I came across your blog about repairing the Jura Nesspresso coffe maker and decided to give it a go when my machine started suffereing from “mad blinking” and couldn’t use it for some time. After removing the oval screws, I followed Enzo’s (from Turin) advice (update November, 12th 2012) and repaired my NEspresso coffee maker.
Thanks for the very helpful blog and special thanks to Enzo for the solution to the problem.
14 September 2014
Szilveszter P. in Budapest, Hungary dropped me a line about his success in making a tool and cleaning his machine’s on-off button:
Thank you very much for all the information on your blog about repairing a Nespresso machine. I had the same power button problem, and successfully fixed it, with the help read on your site. I wanted to fix it right now, so could not wait. My solution was using a cocktail spoon I found in my kitchen right after I gave up fixing it right away, and some flat wire. It worked for me, and I could fix the power button. You need to press a bit hard while using it, but it worked for me.
20 September 2014
Sjors H. of Waddinxveen in the Netherlands sent me a story and picture about replacing capacitors in his Nespresso XN2105:
Your blog on the Nespresso is repairs is impressive. I made my wrench from an Ikea adjustable foot for a drawer. I’m from the Netherlands and my Nespresso XN2105 blinked irreguarly, while heating up and gave only a little water afterwards. After disconnecting the flow sensor, I got a full cup of water. It turned out to be the 680nF capacitor that had only 100nF of its capacity left. I replaced it with 470nF I had laying around and the machine works for now. I also put some conductive glue on the pads of the buttons to get them working well again. I hope your blog will help many people to repair their machine.
6 October 2014
Pedro A. of Lisbon, Portugal sent his thanks for helping him repair his Nespresso XN2001:
I could not let my day finish without thanking you for the Nespresso oval screws hack :)
As I stumbled on your pages, the idea of getting on the queue to have a chance of trying one of your sockets crossed my mind a few times, but as long as I read more and more ways to hack the damned oval screws I gave a try to the melted BIC pen. Well, it worked like a breeze :)
Five minutes (or less) to get to know where the silicone button had gone (literally gone…) after half an hour trying to access the screws with pliers.
Please accept my enthusiastic salute to ALL of the people who contributed to make life a little less hard to the rest of us. The idea of a world wide traveling socket just made my day and I wonder where this civilization could reach if we acted like this in so manny different activities.
My silicone button is ruined (FUBAR, actually) and I am wondering in ordering a replacement or try one the third party button solutions I saw on your blog. In the case that you want another repair story, I enclose a couple of pictures.
Thanks again for maintaining this kind of public service ;)
13 October 2014
Eros C. from Italy reworked a coffee capsule to fix a leak, here’s his story with many illustrations:
Hi Chris, thank you a lot for your blog… i used some info that i’ve found on your blog in order to repair my nespresso coffee brewing machine i have at work..
The original problem was that using the compatible capsule the capsule holder inside the central brewing unit (CBU) of the nespresso machine went loose.. so when we are going to use again the original nespresso capsule instead of the compatible (hard plastic type) the water injected inside the capsule was leaking from the capsule holder (when you was making the coffee) from the bottom inside the waste capsule container.. the water was not going only through the capsule to the ejector that let the coffee flush on the coffee cup but the same water was leaking from the holder through the bottom ending in the waste capsule container.
i used the bic building socket guide in order do take apart the nespresso en 95 coffee machine.. some photos i saw to organize my idea and make a plan of action..
then i fixed the nespresso en 95 leakege (fig.0) simply using a used nespresso capsule.. here’s my procedure.. sorry i didn’t have any camera or phone with me so i didn’t take photos of the whole process … i hope the information i’m going to send to you will be helpful for some other guys…
first of all take apart the nespresso (or krups) coffee machine until you can see inside the CBU (compact brewing unit) fig.1 , the CBU from the upper will looks like in the fig.2 and moving the lever you will open the capsule holder (part signed with A) after that then you will see the inner plate fig.3 , now simply prying gently with a screwdriver in the points indicated in the fig.3 you will see the front plate popping out from the CBU because there’s only a smaller lever that hold it.
Now take a used nespresso capsule and empty it fig.4 , wash it and cut all the way around over the point indicated by the red arrows in fig.5 , now you will obtain a sort of alluminium disk with a thicker rolled edge like fig.6, now cut the outside rolled edge in the points shown by red arrows in fig.7 because it will be too much thicker for our purpose, at the end you will have an alluminium spacer like fig.8 , a sort of alluminium ring or washer.
Now look carefully at the fig.9 , you will see the capsule holder signed with n.10, it is the part that moves back and fort when you will activate the coffee machine lever, then you will see the inner plate (the one you pryed out before with the screwdriver) signed with n.13 , and the place where you will have to put the alluminium spacer/washer obtained cutting the nespresso capsule because it is indicated by the blue arrow ..

After that you will have to put the inner plate back in it’s position and thanks to the lever that moves back and forth the nespresso capsule holder you will have to press the inner plate back in place.
OK, now you will have almost the job done..
Put together the nespresso coffee machine and if you have done the process in the right way you will have the water leakage problem solved easy and peasy… < all the best from eros in italy … a nespresso coffee machine fixed with a nespresso capsule.. :-)
14 October 2014
Michael N. of Thessaloniki, Greece writes that he machined tools to turn the oval-head screws and is offering them for sale:
I want to thank you for your special blog about repairing a nespresso machine. I live in Thessaloniki, Greece and I own a tool and die machine shop.
I found your blog in search for solutions in my problem. My Krups Xn2005 was not working properly. After a second the cup button wouldn’t pure coffee and the machine was shutting down. It was the same problem with a fellow from South Africa I think but there was no solution posted.
So I made an oval head key to open and make a little inspection wishing it was just a dirty button. Unfortunately that was not my problem and after changing a capacitor that was dead didn’t manage to fix. So I called the nespresso club and they told me that it is repairable and it will cost €40. So I did. And now it is working again.
In the mean time I searched the eBay tool and saw that it is for sale and that maybe I could sell mine back. My design is simpler and more compact. Although I own a cnc in my machine shop I made it by hand. So I realized that I could beat the price and sell it a little cheaper.
After a few days someone ordered my tool! And then I made a few more that they are also sold!
So I want to thank you for this opportunity and if someone needs a tool he can order it maybe from me. This is the link:
http://pages.ebay.com/link/?nav/item.view&id=291262252009&globalID=EBAY-US
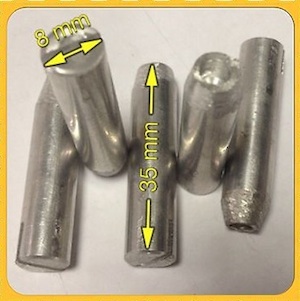
19 November 2014
Bob B. of Toulouse, France wrote me that he used instructions sent by Eros to fix a similar problem on his machine:
Dear Chris,
I red your blog about Nespresso repair, and I wanted to thank you, and thank Eros (from Italy), for the post of October 13th 2014, explaining with great detail sthe way to repair an insidious leakage due to ageing of the mechanism, with a part of a used capsule.
I applied the procedure, and it works ! Again, many thanks, you are great !
Best regards,
Bob
10 December 2014
Boldizsar BENCSATH of Budapest, Hungary wrote me about his success in replacing the capacitors on his Nespresso C100 machine:
Hello Chris,
Thanks for your page, I’ve posted my own detailed stuff at
http://boldi.phishing.hu/2014/12/11/fixing-nespresso-c100-osszevissza-vilagito-ledek-strange-blinking-leds/
Added pictures (high-res, by clicking on them)
boldi
13 December 2014
Chris D. of Surrey, UK borrowed the steel socket and repaired a failed solder joint on his machine’s circuit board. He reports:
Hi Chris,
Just to say that thanks to your blog and the trusty globe-trotting socket tool, I have now fixed my Krupps XN 2100 Nespresso machine.
Once opened and the covers removed from the main PCB logic board, it was fairly clear to me what the problem was. There had at some point been a small leak (a one off I suspect) and coffee had rolled down the LED/button wires and caused a bunch of corrosion on the PCB and solder joints. Once diagnosed as “dry-joints” (hence the intermittent problem initially), I colour coded the wires RGB with a marker, de-soldered them from the PCB and proceeded to use some isopropyl alcohol and cotton buds to clean up the corrosion and connectors on board and the wires themselves.
Once this was all done I simply re-soldered the wires back to the PCB, making sure that there was an ample flow of solder in the joints so as to ensure a good connection; put everything back together and hey presto, all in ship-shape condition again and tested multiple times to make sure I had got both the diagnosis and the fix correct.
I’ve attached a zip file with a few photos showing the corroded joints for your blog, and I have the socket tool here with a bunch of the old screws and the capacitors that Luke sent me from New Zealand as I did not use them. All is ready to be shipped either back to you or to the next person in need; let me know what you want me to do.
Many thanks again Chris.
All the best,
Chris D.
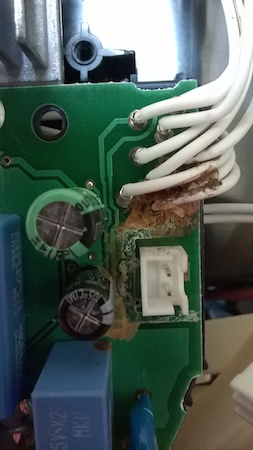
31 December 2014
Ari N. of Santa Monica, CA dropped me a line to tell me all the details about a vacation-time repair aided by a bic pen, I confess I edited it slightly for length!
Happy New Year! I wanted to write you after reading your blog about the oval screws in the Jura Nespresso machines. I hope you’ll find my story interesting and unique…
… all we had to do was bring half a dozen tubes of Nespresso capsules. As soon as I had a free moment, I plugged in the machine, filled the reservoir, opened the lever knowing I would have to prime the pump, and fully expecting it to work, pressed the button… Almost all the normal sounds occurred, except no water came out. I pressed it again, moving the lever, checking the reservoir was seated properly, etc. After numerous adjustments, checking etc. I was dismayed and dejected that I couldn’t get it to work.
So I figured I would try to repair it by taking it apart (no usual problem for me). I was fearful that sitting at this beach hotel for 11 months, the pump or valves were rusted or some seals had failed. But figured I would try anyway.
I happened to have a hex key set and seeing a few Torx screws figured I could take it apart. But as you know that doesn’t get you far. I looked at the oval-head screws and figured those couldn’t be screws - they must be rivets! Damn Nespresso (Jura)! I guess they figured the machines are cheap enough and force you to buy new rather than repair. I then decided to google Nespresso repair and stumbled upon your blog.
What a goldmine! I was astonished to find that I could actually remove the (previously thought of as) rivets/screws! However I needed a tool today! Ordering one, machining one, getting one passed on were all non-options as I am on vacation with almost no tools and there is no home cheapo here or anything like it. However, reading about the bic pen, I thought, well maybe I’ll give it a shot. Turns out the little shop up the road actually sold them so I bought 3 (knowing it took one guy 3 tries). I was hoping that it was a stuck check valve and not something more serious and figured if I could get the cover off it was worth a try.
Suffice it to say I melted a pen, set it on a screw to get the shape and bingo, IT WORKED! Like a charm! I was incredulous and ecstatic. I then had to figure out how to get a bamboo skewer (in a small town in Mexico). I looked around our hotel room, and after trying a few small screwdrivers and such that I keep in my dop kit, realized that the ink insert I had removed from the pen was the perfect size tool!
Inserted it gently, replaced the hose, put the tank on, plugged it in, and BINGO, water started flowing out the dispenser.
Suffice it to say, my wife repeated that’s why she married me, and we now have espresso again every morning. Thanks to you. Didn’t even need to ask you to have Chris D. forward the tool to me.
I’ve attached a photo in case you want to use my story (hopefully edited for length) showing that all you need for this repair is a 70-cent pen and some fire. One thing to note that might be helpful to future readers using this method is that the pen needs to be melted quite sufficiently that the orifice melts small or closed and is well melted and you have to hold it onto a screw without moving until it sets hard (probably 15 whole seconds). If you do that, the shape of the inset/socket (as you can see from the photo) will be pretty perfect.
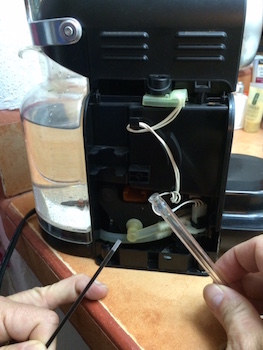
Stories in 2015
4 January 2015
Carlos M. of Lisbon, Portugal wrote me about repairing his brother-in-law’s Nespresso machine by removing the thermal fuse entirely (which I can’t recommend - my opinion is, the more safety the better in these blasted little devices):
I’m writing to you to share my adventures repairing my brother in law’s Nespresso, in which your blog had an important role!
“This died on me. It doesn’t turn on anymore. I’m going to get rid of it, unless you want to try to repair it.”
“hum… that is probably a fuse… let me check”
That’s how it started. The first difficulty were, of course, the screws. After googling a bit, your blog stood out with lots of information. As a first step I created a tool for those screws using a powerdrill and a bigger screw. Next, I read all your blog posts about similar problems, and found that one of the thermal fuses was blown. Since there are two of them, I just removed the blown one and connected the wires together.
Finishing, I replaced the screws with some normal ones, to ease future support :)
“Here you are, it’s fixed, just try not to keep it on for long, just in case”
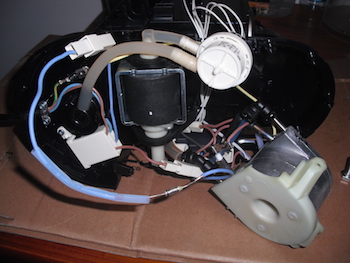
9 January 2015
Jim O. of Germantown, IL sent me a novella (just kidding Jim! :) about repairing his drip coffee maker:
Hi Chris, Add me to the list of those indebted to you for your wonderful blog! Thank you! Thank you!
Because of your blog I was able to perform a fairly straightforward repair on my Krups 130A "Coffee Aroma" coffee maker. The problem was obvious: the power switch was failing - if I manually held the rocker switch in a position halfway between on and off I could still make a pot of coffee. Less than satisfactory if you’re making ten cups, which may take about 5 minutes to brew! No big deal, right? Simply remove the bottom of the coffee maker and change the switch out.
Wrongo! Like the other Krups tales of woe, there was a pair of oval-head tamper proof screws at the bottom of 3/8" diameter, 1 inch deep recesses in the base plate of my coffee maker interfering with my simple repair. I googled for "Krups coffee maker oval screws", and I was fortunate enough to find your blog. Before trying to machine a metal tool, I decided to give the melted plastic pen technique a whirl. Finding one from my local credit union, I held the end in front of a MAPP torch flame. After a few seconds I could see a nice blob of molten plastic at the end of the pen. Plunging this into one of the bores till it bottomed out, I waited a few minutes, then tried turning the plastic barrel. I have to admit, I was not optimistic. I was surprised, then elated, when I easily turned the first screw out. Separating the screw from my pen tool, I easily removed the second screw. FYI … using a caliper, I measured the screw head ovals to be 5 mm x 5.7 mm
Getting to my repair now, my European-designed, assembled in Mexico, coffee maker had a 10-cent power switch made in China. Switch specifics:
lighted SPST rocker switch 3 spade connections - 3/16" tabs (most replacement switches are 1/4") Hole dimensions: roughly 7/16" by 1"
I couldn’t find this switch any place in other than lots of 50 or more, so I settled on a $7 GSW-42 Gardner Bender switch that I could Amazon Prime to my home. It took a little whittling with a utility knife on the hole in order to make the new switch fit. I also had to cut off the three 3/16" spade connectors in my coffee maker and replace them with 1/4" connectors. Just got through putting the whole thing back together with, of course, two new sheet metal screws! Have attached pictures of the plastic tool with defeated tamper-proof screws, and the inside of the coffee maker with the original switch.
I noticed that you’ve added a Jan 2015 entry to your blog, so reasoned that you may still be taking on new material. If you judge my little narrative to be of any value, please feel free to add. I’ve spent more effort on this repair than the coffee maker may have been worth, but it was gratifying to extend the life of a perfectly usable appliance in an otherwise disposable society.
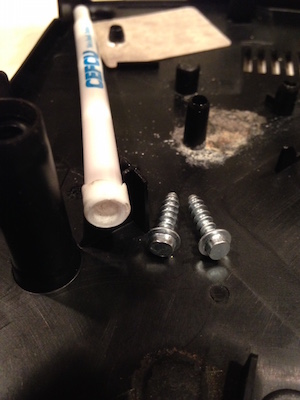
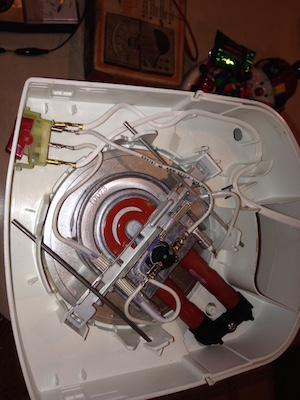
10 January 2015
Nick G in Hong Kong sent a short note about his machine problem & repair:
Thanks to your great blog, I managed to fix my Nespresso Essenza in a matter of 20 minutes. I had the same power switch problem that you had.
Fabricated my oval screw tool from a Bic biro (only one required), opened up the sides, switch out, windex the contacts and reinstate. Good as new.
14 January 2015
Nicoloas P. of Valeyres-sous-Montagny, Switzerland wrote me with advice on building a socket to turn oval-head screws:
I am not sure if the related blog contains this simple way to ‘build’ a socket for the oval screws:
Looking for a pipe or cylinder to be transformed to have an oval end, I eventually got across a ‘pipe’ with a M5 thread cut into it. This might be called ‘bush’, ‘screw collar’ or ‘threaded sleeve’.
It needs to be s.t. like 3 cm (more than an inch) long.
Squeeze an end with a bench vice (or vise) to become oval.
17 January 2015
Kevin L. of Newcastle, NSW, Australia gave details of his battle with roaches in his friend’s Nespresso machine:
Whilst tearing my hair out trying to find a way of opening a friend’s leaking Nespresso Citiz, I stumbled upon your blog.
The melted ball-pen trick worked magically, but as you say, melt it down to a round blob at the end to get a strong and solid tool.
The cause of the leak became rapidly clear. Our local roaches, A. periplaneta and B. germanica, love the mouth-feel of silicone rubber, and if they get water at the same time, even better! Did I mention they also like warm and dark?
As a local repairman said to me, they are what keep us in business, because the ones that don’t chew pipes and insulation short out the electrics.
The cause of the problem is clear, you can even see the chew marks.
As these are all at the low pressure end, I’ll replace the damaged segments. All else is OK.
Thanks for the inspiration and a fascinating blog
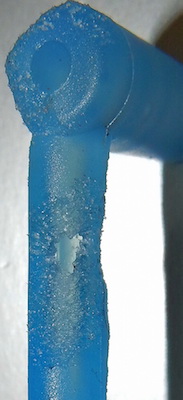
28 January 2015
Ádám H. of Százhalombatta, Hungary reported a Nespresso repair success:
Have repairing essenza machines for some time now, but I just found your page, sadly not earlier.
Mainly I got essenzas with the broken elbow joints, and essenza automatics because of the blown capacitors, but I figured out those myself. Also I have found earlier the spanner bit opening for those f#@&#&n oval heads (but I always change them to standard screws). This time I write you because of a ‘failure’ because I got the damn thing to work, but another two error surfaced, and it is really interesting, just wanted the community to know.
The speciment is a “Tur-Mix TX-150”, practicaly a Krupps Essenza automatic. It was given to me that do what you like with it from one of my relative. The main problem was the knows oddly-flashing-leds thing, nothing to see, change the two capacitors (picture attached before/after) Note that the PCB has holes for 3 diferent size capacitors, so even Jura thought about it maybe. Also note that Jura uses lead-free soldering material so unsoldering it will take higher temperature AND precisity, because the holes are galvanized, so they can be easily ripped off. Assemby (yes I have broken one connector, but repaired it) and anything looks good. Until today when I arrived home to see a huge amount of water flowing from the machine. No broken joints, and based from the amount of the water it must be on the low-pressure side. Thought of the flowrate meter, because it was wet and yes, it was not that watertight. After disassembly (rotate the head) I changed the old O-ring and used some piston grease to be sure. It was good, but water keeped to flow so I drained all the water from the machine putted it to a clean surface and puted the full watertank back, and voila (see the last picture) the compressor was leaking from the low pressure joint, and from under the plastic joint. Nothing to see up till now, but it can’t be worse, I will somehow dismantle the thing to see what can be done.
The compressor is an Invensys CL4, but of course it is really hard to find one (and is near 30 EUR plus shipping) I had a spare CP4 home (don’t ask, I had) which is slightly stronger (70W vs. 60W) but with the system as-is it is working like a charm. If I can manage to do something with the compressor I will contact you and the community again.

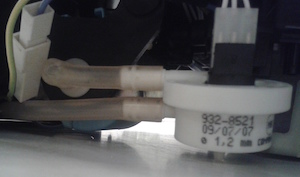
31 January 2015
Harry E. of Amersfoort, The Netherlands had to replace fuses AND capacitors to get the caffeine flowing again, he writes:
I got the Krups XN2125 defective from someone. It was dead as “a pier” and nothing helped. After a struggle of 1 hour the machine was open en indeed one thermic fuse was blow, after replacing it (€3,50) there was again life to discover but suddenly (after 2 coffee) the two switches were blinking rapidly as it shouldn’t be. After replacing the 2 capacitors (680nF and 220nF, €4,50) the Nespresso works again as it should be.
I did replace all the damned screws with normal 3.5x12mm and now no problems anymore with opening and closing.
THX for the info/help/photo’s
The picture shows the fuse location, i used a connect block to test if it was really the fault fuse.
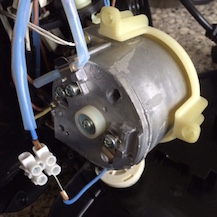
1 February 2015
Jaco van der L. of The Netherlands reported a new source for an oval-head tool, and also success with fixing a leak (but I couldn’t show all of his pictures):
[The source] is a Dutch site, but I don’t think that will be an issue:
http://www.esprase.nl/product_info.php?products_id=569
Including delivery cost (within Holland) it was 8,88 euro.
My Nespresso Citiz & Milk was leaking water, so I bought a tool (a 1/4 inch bit costing 7 euro) and opened it up. On picture 1 you see which part comes off first. You do have to work on the internal fixations a bit, maybe picture 2 is helpfull in understanding where to get it open without damaging it. The next step is to loosen all cables and connections, as shown in picture 3. Then the main housing can be taken off. After removing the 4 screws, it comes off easily (picture 4). The 2 flexible tubes are for water feed and aeration to and from the water beaker. I noticed that the aertion connection had come loose. With a bit of manouvering and use of screwdrivers I was able to reconnect it without further opening the machine, see picture 6.
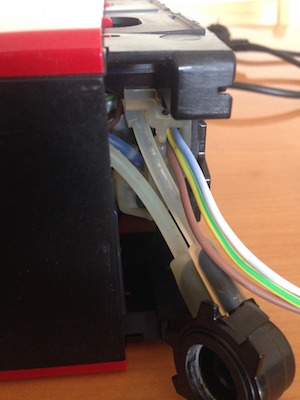
1 February 2015
John P. of Athens, Greece also repaired a faulty thermal fuse:
I own a Krups XN2120 for a few years. During a cold day of the winter, I opened my machine and saw the lights fading strangely. After 2 minutes my machine died.
I decided to try and open it up before throwing it away, so I did some googling while trying to open the tricky screws, so I managed to craft a tool by drilling a bolt, took me about 2 hours or so.
Then I got my electrical testing screwdriver and found out that the power of the machine stopped right after the thermal fuses. After searching about the fuses I found your blog, so, I called a few shops with electronic equipment and found the fuses at a very cheap price (10 pcs - 5.90€) and replaced both of them.
Finally, I replaced the screws with typical screws [3mm diameter, 16mm length] for future cases!
I’m sending you two pictures with the fuses locations on the boiler, and the screws I used to replace the originals.
Thanks for sharing the info you’ve managed to find.
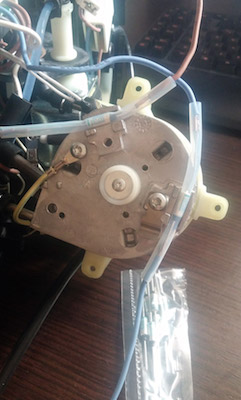
2 February 2015
Ádám H. of Százhalombatta, Hungary sent more details about leaky pumps:
I have disassembled the invensys cp4 vibration pump to see, that the plastic valve has broken in the line of the factory welding (see arrow on pic 1) so like this it is the smallest problem that it leaked, the bigger is that it also sucks in air when running and the pressure just cannot build up, so not optimal in any way. I could locate a reseller here in hungary that sells ARS CP4 type vibration pumps (nearly the same as the Invensys (pic 3) ones and also made in Italy, but for higher-end presso machines, see pic 2) which was about EUR 5, so I give it a try. There was 2 main difference, one is the electrical connectors (looks to the other side) and one is the thermal fuse. The only big thing needed was that the electrical conector for the pump must be slightly longer (I used a d=1,5mm copper cable, 10cm long) for it to work. If it does not starts don’t be afraid, just change the two wires on the pump and it will work. It works like a charm, and caffeine could run through my vanes once again (excep caffein-free capsules of curse at night).
For sidenote, the ARS CP4 has the same pressure-volumerate curve as the Invensys one, but according to the machines plaque it needs less cooling time ([sarcasm on] Note that the Invensys pump says 1.5min cooling after 1min operation at 60W, but the electronics are for 70W, and in this case 1min operation-2min cooling, so proper descaling technique is like the one at the nespresso page? [sarcasm off]). So they can be exchanged if this is the broken part, but look out for the proper electrical connection, because the pumps input is the same as the heat exchangers, so quite large amount of current will be going through there.
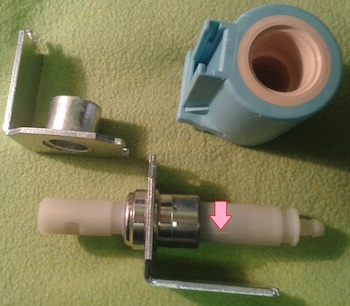
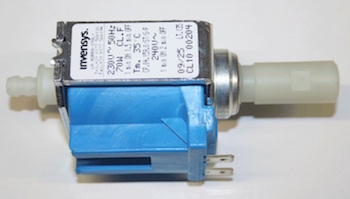
9 February 2015
Cam B. of western Canada sent an update about his 2013 repair adventure which also relied on the kindness of strangers:
An update, and success story.
I finally had someone in the UK purchase the temperature sensor I needed from a UK website and ship it to me. The website wouldn’t ship to North America, so this random internet user from Reddit’s /r/coffee userbase was kind enough to purchase it and ship it on. So I installed that part, and powered the unit back up, and… it still wouldn’t make coffee! So then I dug into the power flow to see what was going on, and discovered the thermofuse on top of the boiler was open. I replaced that with a $3 part from a local service supply. Put everything back in place and switched it on. Success! It filled the boiler, heated the water, and pumped it out of the discharge port. A coffee soon followed. The unit has been running flawlessly since.
9 March 2015
Ian G. of the Isle of Man sent a snapshot showing his superior soldering skills :)
I have a Krups XN2120 which had displayed the flickering buttons problem a couple of times but had corrected itself when turned off and left for a few minutes. Then a few days later the machine was dead. I expected to have to throw my machine away but found your blog, made a tool and took the machine apart; one thermal fuse had blown so I replaced it along with the two rectangular capacitors and it is back to functioning perfectly. Thank you for collating all of the Nespresso information -it has saved me the cost of a new machine. I have attached pictures of the new parts in situ and of the tool I made.
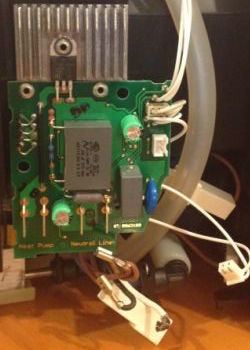
24 March 2015
Mary M. of Wollongong, Australia found a way to fix an air-locked Nespresso machine. She reports:
I found your blog by chance as I’ve had problems with Nespresso N95 and was going to ask if your tool would find its way to Australia but first decided to try the “melting the bic pens method” for those horrible oval screws. Took a few goes but it worked!!! Thanks so much for your blog.
Only problem is now not sure how to fix Machine now.. Machine turns on fine but when I press the button to make coffee it’s making motor noises but not pumping water at all. Was hoping it was a loose hose but they all seem ok.
Turned out I didn’t need to take it apart at all. Apparently the internal pump gets air locked if machine not used for a while… found answer here: http://www.whichpodcoffee.com/nespresso-problem-water-coming
1 April 2015
Jaap H. of The Netherlands reported that a standard 3.5mm socket will turn the oval-head screws:
Hi Chris, I read your site on the special tool to open up a krups nx 2105 I was a bit surprised to read it took you all so long to find one. I used a small 3,5mm size metric socket. One of those that sit on the end of watchmakers screwdriver type tool. 5 dollars for a complete set. It slips nicely over the screws. Had it open in a minute.
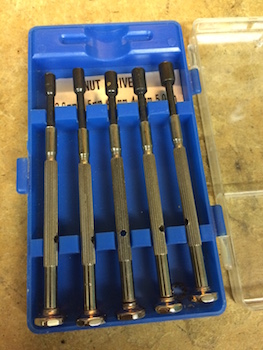
11 April 2015 Micah
R. of Park City, Utah got his yard-sale-find Le Cube working again with the traveling socket:
Thank you so much for arranging to have the socket wrench sent to me. It worked like a charm, after trying multiple different variations on the theme including trying to melt several bic pans, trying a needle nose pliers, trying a soft aluminum screw hole bent to fit.
I have a new espresso Le Cube. My wife picked it up at a yard sale for $30. My problem was that the button for the small cup only produced a few drops, and the button for the large cup produced way too large of a cup and just didn’t stop going. I’m not sure exactly what the problem was. I opened up the machine, made sure everything was clean, made sure all of the buttons and levers were adjusted properly, took off oneof the hoses to make sure that the O-ring was not worn out, reconnected it, put the whole thing back together, and it works fine. I suspect that the problem might have been the hose connection, or just that it was not clean enough.
I am happy to forward the socket wrench to the next frustrated self repair man. Just let me know.
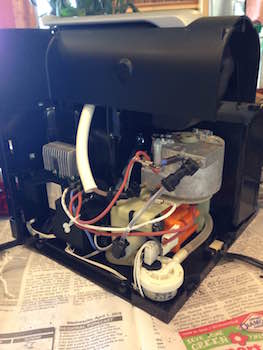
27 April 2015
Tim W. of Melbourne, Australia sent a note about his capacitor repair:
Greetings from Melbourne Australia
Thanks to your blog my nespresso essenza is back in business. We also had rapid flashing lights then total failure. I opened the case with a #10 spanner bit, found one of the thermal fuses had blown. Found replacement fuses and caps on ebay and waited… with the final part arriving tonight I can report the surgery was a success. Pics show new yellow caps and 2 green lights!
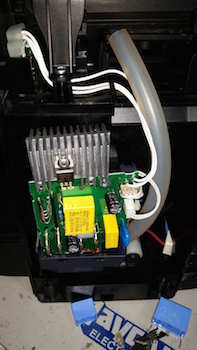
9 June 2015
Jan Willem van K. of Meppel, The Netherlands reported his struggles with a whistling Nespresso cube:
What a wunderfull site you made about the Jura Machine. When I discovered the blog I was already past the oval screws, and was looking for the reason of the sudden death of my Cube Nespresso Coffee Machine. It appeared to be the thermal fuse which had be burned. After already replacing the brewing unit last year, this was the next challenge. But thanks to your website I managed to discover about the thermo fuse. It was a pity that the first replacement didn’t last long and I had to change it again. Again the hard plastic disassembly and again the oval screws, for which I have bought a great €13,- tool. It even fits in my electric screwdriver. But after the second replacement of the fuse it appeared to have changed the coffee machine into a singing teakettle. Either I did something wrong, or I’m a great transformer. Any idea what this could be?
Ádám H. of Százhalombatta, Hungary spotted Jan’s report on the blog and offered a diagnosis:
Because the machine has blown more thermo fuses in a rather short time, I think the NTP (Nespresso Thermoplan, the thermal sensor of the heating unit) has either misfunctioned or blown but in electrically closed way, so I think that the sensor is the problem here. It can even answer the whistle thing also, beacuse normally the water cannot be hotter than 112-115°C based on the system and the fuse itself, and this much steaming can be done only if the heater unit is overheated.
If the NTP is working correctly (it can be tested in an other nespresso machine, that uses this heater type), then the electric board is defective, and it allows continuous heating. I don’t know that the Magimix type Cube uses the relay based electric board or the triac based one, but measure the output to the heater before anything.
The nespresso systems uses 6 bars minimum when running (mainly at lungos and the cosi). Pre-heating of the water is to 95-96°C (on start, ambient pressure) which can cause at the outer surface of the heater unit more then 100°C (but slightly beacuse it is metal, so conducting the heat quite well). The thermo fuse burns out either 116 or 125°C, don’t remember which is at the heater, but I remember it is the 125°C type. When running at full power (16 bars) the boiling point of the water is near 200°C, but of course the system regulates it to 96-97°C for the optimum coffee brewing.
But if the NTP is working incorrectly 112 degrees can be achieved (theoreticaly and under pressure of 1.5 bar abs. of course), and like this large ammount of steam can be generated when opening the lid, even when not running because geometrical reasons there will be excess pressure in the heater (didn’t measure it out, but when boiling it can easily increase the pressure with ~0.5 bar), becuse it will boil the water, not just heat it, and the unit is manufactured for hot water, not for steam (which requires 1000x more space and can flow only into one direction because of the pump blocking the other way), of course the steam will not be more, than 100°C but the water in the heater can heat up to that much before blowing the termal fuse.
Jan Willem v. K. wrote back to report success:
Thanks to Adam my steaming coffee machine works again !! I start to get really handy with disassembling the “Le Cube”. It was the NTP or as we call it, the “temperatuurvoeler”. At www.onderdelen-totaal.nl they knew which part it was, so it was easy ordered. replacing the NTP this machine works well and no longer generates steam.
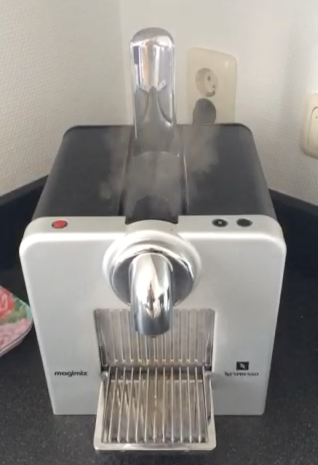
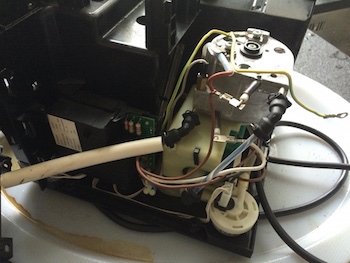
26 June 2015
Tal H. of Israel wrote me about replacing the flaky rubber button in his machine:
The last time the button was not working I sent it for repair at Nespresso. For a significant amount of money and a lot of effort on my part, I accept service rather dubious - I guess they just opened and cleaned the button.
This time - With the explanations I found at your blog I was able to prepare a screwdriver and replaced the button (standard “momentary button”)
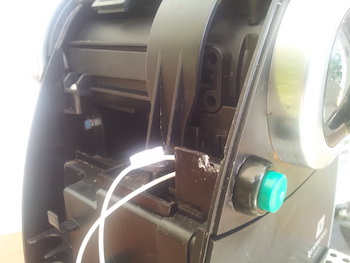
11 August 2015
Dave W. is a frequent flier in this blog, he writes:
Another update from Dave W in Lake Worth. This time the green button on my Essenza stopped working, and disassembling it and cleaning it did not work. I bought a green button off Amazon (search for B00HZY5U2M) to match the red button I replaced the power button with, and found a large green LED in my junk box. (Search Amazon for B004JO2PVA if your junk box has no LEDs.) I unsoldered the existing button, replaced it with the new button and LED, and drilled a hole in the front panel for the new LED. It works great now. I’ve definitely gotten my money’s worth.
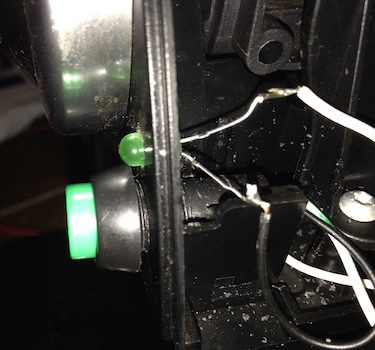
19 August 2015
Graham S. wrote from London about repairing a Krups XN2800 machine:
I found your blog a few days ago when I was looking for info on a faulty Krups XN2800 Nespresso machine that I’d come across.
I replaced both caps although possibly only one was faulty. However, as they only cost me £1 for the two I couldn’t be bothered fussing with changing just one then the other if necessary.
In 2012 here was a chap called Patrick d’H. from Cape Town asking about a unit that switched itself off when the coffee button was pushed, the same fault that my one exhibited. I can confirm that replacing both the 220nF and 470nF capacitors has fixed the fault for me.
Great blog!
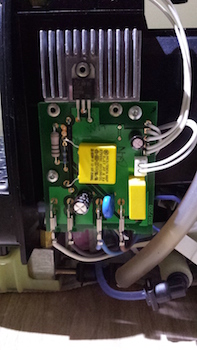
13 November 2015
João B. of Lisbon, Portugal took his Krups Nespresso on the high seas:
Congratulations for your blog on Krups Nespresso machines. It helped me a lot, mainly with the tips to take out these oval head screws. Nice job.
Starting September 2014 I crossed the Atlantic in a 42 feet sailing boat, from Lagos, Portugal to St Lucia in the Caribbean, via the Canary Islands and the Cape Verde Islands. As you know the first is a Spanish region, while Cape Verde is a former Portuguese colony where the official language is Portuguese.
A nice and peaceful trip that started in mid September and ended in the beginning of December with a total of 30 sailing days.
We were 4 Portuguese people on board and as you know Portuguese enjoy an espresso coffee after lunch and another after dinner as well as some others during the day - and night ! (in such a trip you sail day and night with men on watch 24 hours a day).
The problem was: Boats up to 50 feet normally do not have a 220VAC generator. They all have a 12VDC system and for such a trip almost all have small inverters 12VDC to 220VAC to charge computers, mobile phones, shaving machines, etc, etc.
These inverters are typically rated 100 to 300 Watts.
But my Krups Nespresso is rated 1260 Watts. Big problem. Not enough 220VAC power onboard.
However: 4 people, minimum 4 coffees per day times 30 days = 480 coffees. That deserved some investigation.
To the great disappointment of my wife I borrowed our coffee machine from the kitchen, having promised her that I would return it in good working condition. That was in mid August 2014 and I forgot to tell her when I would return the machine.
Machine is Krups type XN2100, 220-240V~ 1260W 50Hz. Made in Switzerland Ref XN210010/1M0-0606
Test with a power meter showed that the heating part of the machine, the one that heats the water to approximately 85 deg C, consumed 1200 Watts and the pump had a consumption of 60Watts, for a total of 1260Watts. This pointed to remove the heating, thus reducing the machine consumption to the 60 Watts of the water pump, which the inverter could supply. Cold coffee is no good so water had to be heated to boiling temperature in the gas cooker and transferred to the coffee machine container.
I disconnected the wire that powers the heating resistor. Green circle shows tip of power wire (with red insulation tape covering the female connector). Red circle shows male connector on heating element
I disconnected the temperature detector (see green circle). The machine would not start. I measured the resistance of the temperature detector and connected a variable resistor of a slightly bigger resistance (see upper red circle) to the temperature detector input (see lower red circle). The variable resistor was adjusted. When it reached 6.85 kohm the machine started operating. Good
I heated water to boiling temperature in the gas cooker and filled the water container. Then took three cups of water (without coffee) to heat the body of the electric water heater and then took the four coffees in a quick succession to keep the water hot enough. Quality of the coffees was as good as with the machine before the modifications.
However when disconnected from the mains and connected to the output of a 12VDC to 220VAC inverter that I had at home the machine would not work. I thought that the only reason for that was the wave form of the cheap inverter I had at home. These inverters are good enough to power computers, mobile phones, etc but the microprocessor in the Krups machine is clever enough to block operation when it sees a square wave instead of a sinusoidal wave.
Fortunately the boat had a good quality sine wave (or quasi sine wave) inverter and when I tested it in the boat the machine operated 100%. Bingo.
Warning: Boiling water and transferring it to the coffee machine in a sailing boat is a dangerous operation and should not be attempted unless you have calm or moderate seas and with great caution. The last thing you want to have is a boiling water burn in the middle of the ocean. I saw it happening to a crew mate some years ago. It was not nice. Fortunately we were less than two days from the nearest harbour.
The machine operated quite well during the ocean crossing and all the crew enjoyed their espressos every day after lunch and dinner.
The boat only returned to Portugal this Summer and I just got the machine a week ago. After some reverse engineering it is working in my kitchen, some15 months after it left it,
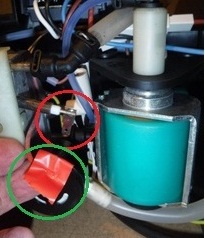

Stories in 2106
18 January 2016
Mark M. wrote from Perton, Wolverhampton about repairing a Krups XN-2009 machine:
I had an unusual request to repair a Krupps XN-2009 nespresso machine. It was dead - however, I would not have been able to open it without the info in your blog. Thanks!
Anyway, I quickly made an oval socket (hand drilled an M6 bolt, with a 3mm drill - and just opened it up sideways - worked a treat!). As a way of thanks - I thought I would share my repair info:
There is a 220uF electrolytic capacitor on the control board. In my case, this was short circuit - preventing the PIC microcontroller from powering up. Replaced the 220uF cap, and it works fine.
21 January 2016
Jason from Hong Kong sent advice about turning those pesky screws:
Greetings from Hong Kong! Just wanted to thank you for your website on removing the annoying oval screws and notify you and anyone else having trouble of another method I found to work for a Jura S9 Avantgarde. I tried quite a few of the suggestions including making a tool from a tube and the Bic method, I was going to buy the tool but (un)fortunately, Amazon won’t post them here, and other sites wanted US$100 for post!
I ended up using an improvisation on a trick I picked up for removing seized rounded bolts from old motorcycles. On motorcycles you can make an ‘ear’ using a cold chisel and hammer to jolt the bolt free. Using an automatic centre punch radially I was able to get the initial movement of the screw. Once you have managed to rotate it, even after only 10 degrees or so I could undo it easily using a pair of long nose pliers. Thanks again for keeping the site up for so long,
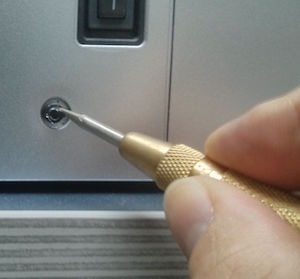
25 January 2016
Niklas K. from Freiburg, Germany related his story about a DeLonghi cube:
A friend of mine let me have a Nespresso DeLonghi Le Cube he wanted to throw away, because “it makes a lot of noise but doesn’t make coffee”… i.e. no water flowing. Researching the matter on the internet, I found numerous fixes from pulling back the lever to tilting the machine. None worked. An air-lock, or rather deadlock.
So I finally decided I had to open up the machine. I was almost at the point of giving up because I couldn’t get out those pesky rivets - or at least that’s what I thought it looked like at that point. It was your blog that opened my eyes that those rivets are actually screws, designed so that people don’t simply open up the machines instead of a repair service doing the job. So I went on to buy an oval screw bit on the internet to open up the machine and to get to the truth of the matter. It turned out that all the tubes and pipes were entirely dry. I found that I could easily disconnect the transparent tube that connects with the white cylindrical thing (see photo - I don’t know if this is the main pump). Using a small and a bigger syringe, I was able to squeeze enough water into the circuit for the pumps to pump water again. Voilá - Le Cube is up and running again!
Thanks for the time you take updating and maintaining a blog that is resourceful, impressive and has undoubtedly been a priceless database for this world’s fix-it-yourself community.
Best wishes from Germany,
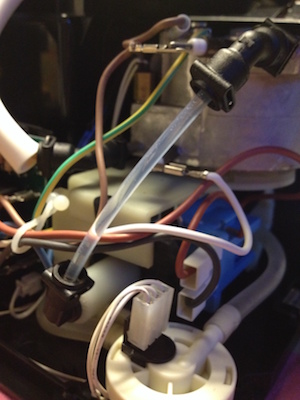
28 January 2016
Tomer B. from Haifa, Israel sent me a note about a machine rescued from the curb:
I love fixing things, so when I saw pretty new-looking coffee machine on the curb I picked it up and took it home… After plugging it in I saw the lights go on and start flashing like hell, after a call to the nespresso support (no help) I started looking online. Found an Italian You Tuber who shows how to make one of those ellipsoid wrench thingy. After opening her up and looking inside I found nothing wrong, cleaned all the pipes and pumps so it will be like new but it was still blinking! Luckily I found your blog and read the whole thing. Never did I read so much about coffee makers in my life! I figured my machine suffered from the mad blinking disease and needed a replacement cap’s so I bought a pair of those cap’s and replaced them east-peasy! Brand new free of charge nespresso machine!
Oh and since I’m an engineer the milling guy at my Eng. company made me a real professional ellipsoid wrench so I can now help all my Israeli nespresso friends!
Thanks a lot! if anyone in Israel needs a hand send them to me!
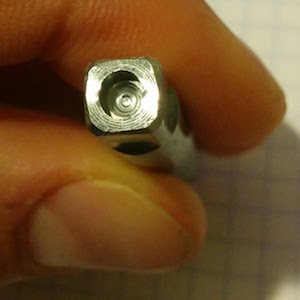
29 January 2016
Robert C. from Bahrain sent me a question about a C90 that I could not answer:
Very interesting blog, I was happy to find so many people interested in keeping their Nespresso Machines running. I’m living out in Bahrain and just had my work nespresso machine (C90) stop working the other day. It’ll turn on and go through the heating cycle, but once the coffee button stops flashing and I start making coffee, the machine stops and turns off. I managed to get it apart and made sure the check valve wasn’t stuck causing it to trip off. Have you seen anything similar or have any ideas? Thanks in advance for any help.
As I continued my troubleshooting, I hooked up the pump directly to 220V (Its a european machine) and the pump works fine. So I’m led to believe the electronics are the cause. I’m more of a mechanical type, so any help getting through the electrical troubleshooting would be great! Thanks again.
Frequent reader Ádám H. of Százhalombatta, Hungary spotted Robert’s question here and sent tips on 1 Feb:
I have two (three) tips, but I think the known capacitor problem is the thing here, there is possibility they cannot withstand the extra heat after start (barely working). The C90 is the manual essenza, so all the main parts are identical that of the automatic ones, so he can try the change of the 220nF and 470nF capacitors. The second tought is the triac driving the heater unit (the 3 legged chip with heatsink on it) but if the heater is heated up correctly I don’t think that it should be the problem. On third the elecrical grid at Bahrain, as I read, it is like at continental Europe (230V 50Hz) with a formerly GB plug type, but I cannot get information about the frequency tresholds, with the nespresso IC-s are really sensitive of, which also can cause this if the capacitors are worn, so we are back at the first point. Other then this I don’t really have ideas that can cause the machine to shut down when the pump is initiated (the pump’s capacitor is the 220nF one). Of course if the machine is dismantled already clean the buttons, they cannot cause this problem, but if it is already in pieces…
Robert wrote me again on 19 Feb with good news:
So I replaced the small capacitor a couple of weeks ago since that one was available in Bahrain, but the machine still had all the same symptoms. Now I just got the big capacitor in and it seems to have solved all the issues. So I would say for this problem you’re probably ok just changing out the big capacitor. Thanks for the help and keeping up the blog.
30 January 2016
Gilles M. from Vernon, France customized his machine with an extra set of (working) buttons.
I found your blog and I must admit that I loved the travel stories of the tools !
After reading all the entries, I tried to build my own wrench, first with my 3D printer (what are they for, if not repairing stuff ?) then using the ‘drill-a-bolt’ method, since my ABS-printed wrench was too soft to unlock the screws.
Seeing some people reported a recurring issue, I decided to to the full makeover : cut the heads of the oval headed screws so a regular screwdriver would be enough for next time (or at least for reassembling the parts) replace the silicon buttons by standard temporary push buttons
Since the push buttons I had on hand were too small to fit the holes, I kept the silicon buttons as ‘labels’ with their power and coffee icons, placed a new green LED inside the coffee silicon button, rewired everything, and drilled two additional holes for the push buttons. I had to cut some silicon and part of the original PCB to have my push button go through, but it keeps the buttons nice and fit into the original holes. Look at the last picture to see how it looks in the end !
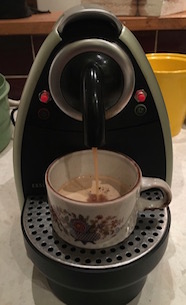
13 February 2016
Chris C. from Mallorca, Spain asked for help with finding a replacement for a cracked resistor on his Essenza’s circuit board:
Thanks for your blog and what you are doing for us Nespresso owners. After reading your blog I managed to open my machine (small strip of aluminium with a V cut in the bottom did the job). I was wondering if you can share the attached photo from my Esenza and ask if any of the community can identify the big (cracked) resistor at the front. I make it 100m ohm, which is huge, and I can’t find any that look any like that, so I was hoping another user had come across the same problem, and had a solution.
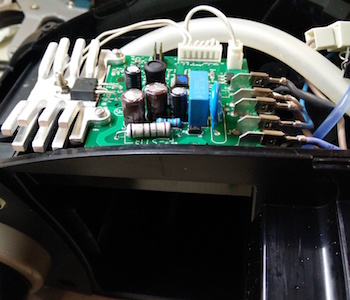
22 February 2016
Ernest K. from Roslyn, NY asked for help with his D290:
Thank you for your great blog. I am searching to find a solution for my d290 problem. The machine turns on but the green lights for the cup symbol and the steam symbol never turn on. The machine does nothing but sit there with the red “on” light illuminated.
The heater gets hot. The red “on” button behaves abnormally. It should come on flashing until unit warms up and is ready. Should then go solid along with the green cup buttons and steam button. Mine comes on solid immediately and green buttons never light up.
Any ideas? TIA.
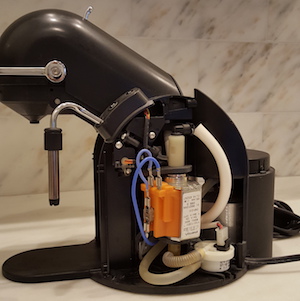
28 March 2016
Lindsay G. from Australia offered much guidance about tools for working with security oval-head fasteners:
Originally i was going to write about my repair like everyone else, but as i was reading the blog - i felt in my opinion that there was a vacuum that i could fill. Before i could do anything with my machines , before i could start any repair, I needed to take out those screws. Seriously i tried everything on this blog to get the screws out, i even bought the screwdrivers from the referenced area above. Some of the tools strip out far too early and you can tell from the feel that they are made from cheap metals - even though there advertisement descriptions read otherwise. Some of the other screwdriver kits (such as the ones from harbor freight) don’t even have the oval screw bit anywhere in the case; while the other links are plainly the incorrect oval drivers. Although, It is noted in the header that the sets don’t have the oval screwdriver bit. I have to admit I did some wishful shopping in hopes that I would find that oval bit in those cases. I know shame on me… Chris said it well throwing good money away…
After some personal research and long chats with each company, i finally sourced a good list of some screwdrivers and screwdriver kits/sets that I think should be placed in the header portion of this blog [ which is done - Chris L. ]. After all - getting the screws out is the starting point that we all face; and if we could just get by that hurdle easily - it’ll allow us that extra energy to focus on what’s actually important - fixing the machine and getting back to enjoying a rich, smooth cup of java ;) okay, let’s begin. i promised Chris that i wouldn’t slander anyone in my write up. so the cheaply made screwdrivers that i bought that stripped out after a few turns - i won’t even bother mentioning; and i actually purchased every single one. i also double purchased some of the good ones, just in case they were bad. i ended up returning the spares of the good ones for a refund because i didn’t need them.
The first picture shows the n-usa-o, there should be a link in the top area of this blog for this one.
The second picture is a complete security screwdriver set with the oval bit in it. It has everything: magnetic handle, torx screw bits, and most importantly the oval bit. I love this set and I couldn’t live without it. Since I’ve owned it; it has successfully helped me repair so many machines - not just coffee machines. It is called the security-screwdriver-bit-set-102 [ link above also - Chris L. ].
Here’s a coupon for Newelectronx that I used that might still work for anyone looking to buy: “Newelectronx-Breast-Cancer-Awareness”. It gives 15% off. That helped me dearly on shipping expenses
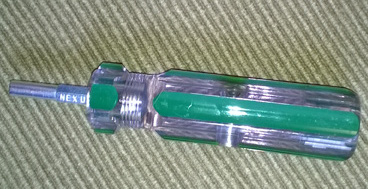
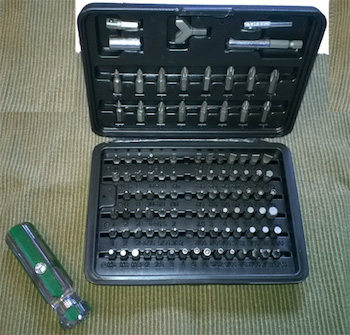
29 March 2016
Eduardo C. from Lisbon, Portugal reported a successful repair of his D120:
Many thanks on having that repair a jura nespresso machine blog with some shared stories, since I was able to repair my nespresso machine.
I don’t know if you are still updating with new stories but I’ve decided to share mine so it can help others.. I’ve placed some pictures and videos in the following link during the repair: https://goo.gl/photos/DEM1MeE3kGJW3JZy7
I had a water leak from the bottom of my nespresso D120 and no coffee came out.. Went to a nespresso store to get it repaired and they would charge me 65€ fixed price per repair, whatever the problem might be. It seemed a little bit excessive for a leak so I tried to repair on my own. For the oval socket I’ve used some sugestions in your blog and make my own from a bolt. The bolt was long enough to be able to unscrew the bolts with my hands without making much strenght..
One video shows where the leak was. The retainer spring had brake and the pipe wasn’t able to keep in place due to the water pressure. I used a hair pin to replace the spring retainer and cut it to fit the socket. A second video shows the machine working properly with the hair pin securing the pipe. I hope it holds until i buy the retainer spring which I found for about 0.65€
thank you once more
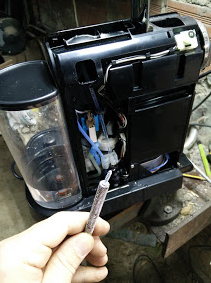
31 March 2016
Ruud R. from The Netherlands posted a video of his XN5005 Cube’s bad behavior, rapidly flashing its two little-cup & big-cup brew lights. Then he sent me a picture and explained how he repaired the machine:
I’ve read your blog entirely and perhaps is my problem with the alternating flashing buttons the same as the rapidly blinking lights on the jura machine? https://goo.gl/photos/2b9AUjK7zoGkdFBK6
you can add a new succes story to your blog! I have replaced the two caps with new ones and the Cube is giving coffee again! The screws are replaced with normal pozidrive ones. Tnxs for keeping your blog alive!
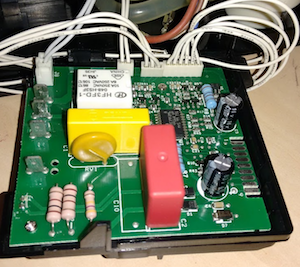
26 April 2016
Trevor A. from down under in Sydney, Australia crafted an oval-head socket from an old bolt and sent me a picture:
Many thanks for your Blog. I have a DeLonghi EN 90.M Nespresso machine, where the power button was taking more and more presses to power on.
After reading your really interesting blog and all the suggestions, I made myself a tool to remove the dreaded oval head screws, by using the suggestion (by Dave H. at beginning of blog) of drilling an oval shaped hole in the end of and old steel bolt. I was able to remove a non-recessed oval head screw using long nosed pliars, and used this screw to continually test the recess I was drilling in the end of the bolt, drilling a little at a time, starting with a centre hole, and then extending it sideways with a slightly smaller drill bit, till the screw head fitted. I was then able to remove the sides of the machine using the tool on the four recessed screws underneath the machine. Then removed three more torx screws to remove the plastic top casing of the machine. I could then easily remove the circuit board and power button. I cleaned the “contacts” on top of the circuit board and the bottom of the switch with methylated spirits, reassembled the whole machine, and power button worked first time!
Unfortunately, I don’t have a photo of the coffee machine disassembled, but have attached a photo of the “tool” I made from an old bolt. The tool was made with just 2 drill bits, an electric drill and a vice for holding the bolt. I’m not an experienced machine engineer or tradesperson, but a retired computer professional from major computer company, with a career spanning coding, operating systems support, project management, technical pre-sales and systems architecture on mainframes. So I like to analyse problems, fix things and have them working properly!
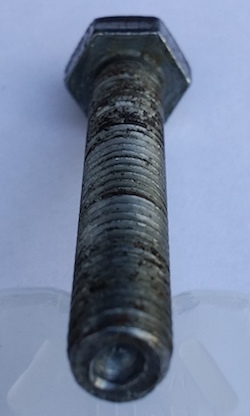
23 June 2016
David A. from Chester in BR-exiting England repaired his Magimix M200 and related the details:
Hi Chris, found your blog while trying to repair our leaking M200 Magimix Nespresso coffee machine so I’m posting details. Its very similar to the D290!
This was a wedding gift 13 years ago so I was determined to get it resolved, a small puddle of water appeared below the base each day - obviously an internal leak!
I got the oval tool from ebay, a seller called “coffee-for-all” within a couple of days and had the thing disassembled quick enough.
Again, it was the plastic elbow coming off the top of the high pressure pump. Initially i tried changing the O-ring but I realised the elbow itself was the fault. Both terminals to the HP pump were corroded too and there was evidence of a lot of leakage, but it cleaned up OK.
New Angle Connector part no 11154 was ordered from “magimix-spares.co.uk”, the only source I could find. The design has changed slightly but functions and fits the same.
The o-ring between the elbow and the HP pump was not in the best shape so I ordered metric 4x2mm (4mm internal diameter, 2mm cross section) nitrile from a supplier for a few British pounds. This was a perfect fit and seems better than the imperial equivalent 5.28x1.78 shown in the service manual.
The service manual is here… http://www.partmaster.co.uk/images/mediator/1984/service%20manual%20-%20xn4050%20(platinum).pdf
All for fixed for £20. And I hope she goes on for many more happy years!
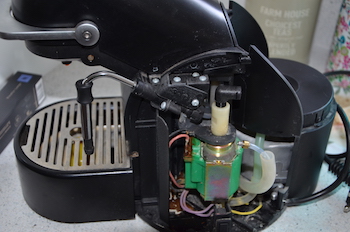
27 June 2016
Julian S. from Geneva, Switzerland fixed a trash-picked Nespresso Turmix 150 by replacing its capacitors:
Hi Chris, I found this site when trying to open a Nespresso Turmix 150, which was left as “broken” next to a garbage bin in the basement of my apartment block. In my experience, something that is apparently not working for one person can be fixed by another.
I couldn’t open it with my security set, so made up a tool from the inside of a brass shower door roller which had a 4 mm thread in the centre. I drilled this into an oval, added a long 4mm bolt as a handle and easily removed the security screws, then cut a slot in each head to allow a screwdriver to replace them.
The green LEDs seemed quite dim, and flashed slowly as the water heated up, then faster as it neared the correct temperature. When I pushed either of the cup size buttons, the pump buzzed on/off/on/off intermittently, taking several minutes to half fill the cup. I only had two 220n capacitors and one 330n (recycled from old wall socket power supplies), so replaced the 220n first with the same results. The 220n was not the faulty capacitor.
I then made up a larger capacitor from a 220n + 330n in parallel = 550n, hoping this would be enough capacitance, and it worked (see picture)! The LEDs flashed much stronger and brighter and the pump came on continuously. It seemed the full 680n is not needed, but I will buy one to add the correct value.
I hope this helps anyone with an intermittent pump problem.
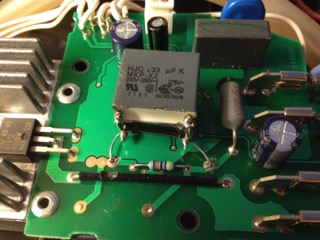
16 Sep 2016
For those who like to play with fire, Kym L. from Adelaide, South Australia offered instructions on crafting sockets from molten metal:
I enjoyed your Nespresso repair blog, having wrestled with these machines a little myself.
A couple of thoughts on the dreaded oval head fasteners:
If you can’t remove any of the fasteners; Find a small, clean Allen head screw and check that the head of the screw (the area that the Allen key normally fits into) will fit into the coffee machine’s fastener recesses, and also over the oval head fastener itself with a little bit of clearance.
Make sure that the oval head fastener is clean and in a clean recess in the base of the machine. Invert the machine if possible. Now dab the oval fastener with a paint brush/Q-tip moistened with a little WD-40 or similar. Mix up a tiny amount of JB Weld and fill the recess in the Allen head fastener with this. Don’t over-fill! Now, squish it over the oval head fastener and leave it in place for a day or so. If you do it right, the WD-40 will allow the cured JB Weld to release from the oval fastener, meaning you are left with a molded JB Weld ‘socket’ that is easily strong enough to remove all of the oval head fasteners in one of these machines if you are just a bit careful.
If you can remove one oval head fastener and you like fire and melting things; Again, this relies on using a small Allen head socket. The different here is that we are going to use heat, so you’ll need a butane burner at the very least as a heat source. Now get your hands on some aluminium brazing rod (hardware stores) or at a pinch, some solder. Have a couple of pairs of needle nose pliers or a vice on hand.
You will need to have removed just one of the oval head fasteners from your machine, intact.
Now, ideally, gently place the Allen head fastener, head upwards and level, in your vice. Heat with your butane burner until very hot. Now melt your aluminium brazing rod or solder (the brazing rod is better and tougher) into the recess where the Allen key would normally fit until you have filled the recess with liquid metal.
Next step, while holding the oval head fastener with pliers, carefully plunge the oval head into the liquid metal and hold it there. In just a few seconds the liquid metal will set hard. Allow to cool. The oval head fastener should now pull out of the mould fairly easily. You now have a ‘lifetime’ oval socket removal tool. (Just hold the threaded part with pliers to turn).
Just thought I’d share these methods for anyone who is a bit stuck. Needless to say I take no responsibility for anyone glueing themselves together or burning their shed down.
Pic 1: Used an old 5mm socket and ‘cast’ the oval head using JB Weld as in the first methd I described. It’s a little rough around the edges but it is easy, cheap and anyone could do it.
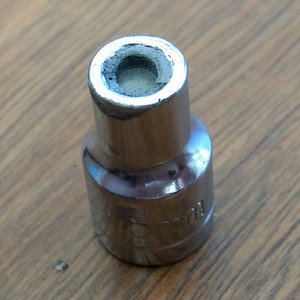
Pic 2: Here’s a pic of a (shiny) Allen head fastener as well as the (dull) fastener that I’ve used to cast the oval head using Aluminium brazing rod. It looks rough but believe me, the oval head impression is actually very good and the tool (held in pliers) would last forever. If I could get more motivated I’d weld the fastener to a screwdriver to make it easier to use. I’ll get there eventually.
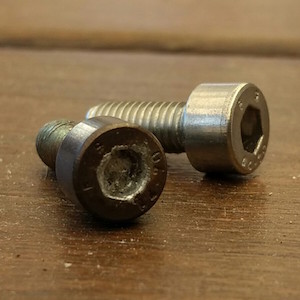
Pic 3: And here’s a pic of the fastener full of melted solder ready to ‘cast’ the oval head screw. Solder melts at a lower temperature than the aluminium brazing rod, but it doesn’t set instantly - once you dunk the oval head of the fastener into the pooled solder, you’ll need to walk away for 5 minutes or so while it hardens properly.

10 October 2016
Jeroen v.V. shared a question about his Le Cube machine:
Thanks a lot for your website! Found your weblog while looking for some information on the Le Cube pcb while repairing and modifying my Le Cube nespresso machine.
I first removed the oval screws two years ago with plyers and brute force slightly damaging the back plastic (but it’s flat against the wall so fortunately it doesn’t show). Found out that the cause of the malfunctioning device where two thermofuses I replaced. A month ago I noticed a leak inside the central brewing unit where my (cheaper) capsules would leak into the waste container. Happens to be the same problem Eros C (13-10-2014) described. Fortunately he also had a fix and following his description solved that problem.
At the moment I am looking for a steady 5v power supply from the PCB I can use to power an mini ESP8266 wifi module which can already trigger the coffee maker (and detect when the machine is heating up). Still haven’t found it yet but when I start working on it again I’ll mail you some photo’s.
19 Oct 2016
Daniel V. from Barcelona, Spain reported a successful capacitor swap on a Krups machine:
this is Daniel Vila from Barcelona (Catalonia/Spain). This is just to thank you for your valuable blog collecting lots of information very useful when trying to repair our Krups.-
In my case I suffered the typical ‘two-leds mad blinking problem’ and replaced both blue capacitors for new yellow ones (you can see the attached picture). Now it works again. Perfect!
hope this info can be useful to others and you can update the page with this email.
by the way, I used a cooper tube , a little bit bend, to extract the f. screws…
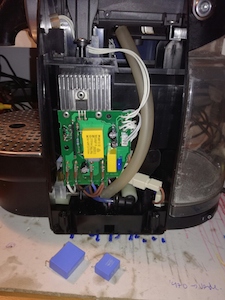
2 November 2016
Rene v.d.W. from Zoetermeer, The Netherlands sent a note and picture about her Krups XN5005:
Thank you for sharing all the Nespresso information in your blog.
Just finished the repair of a Krups XN5005 for the second time. After the first attempt, replacing the capacitors, it was working fine for half an hour but died again with a nasty smell.
The thermal fuses had gone, again, and there was an extra surprise in the form of a completely burned out relay.
After cleaning the soot and replacing the relay all is working well again.
So my advice, if you are to replace the capacitors, replace the relay as well since it is of the same quality as the capacitors.
Seems that I will enjoy my Krups a bit longer than the manufacturer intended, so thank you from the Netherlands.
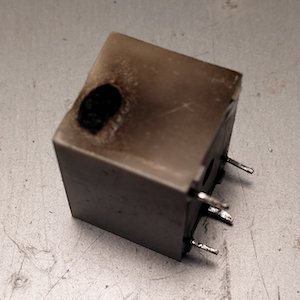
Stories in 2017
8 Jan 2017
Dan L. from Chicagoland shared his Citiz story:
That long blog posting you do about the oval screws for Nespresso machines - wow what a fantastic thread. Thank you so much for doing that.
My story with a Citiz.
It started leaking coffee into the base. It got really bad the day I brought home a brand new Breville Creatista machine. The machine was jealous, I guess. The oval screws, amazing. I ended up with a pair of needlenose pliers and was able to get all 6 screws off. On the Citiz they are not recessed, so it wasn’t too hard.
What was almost impossible though, was disassembling the machine. Whoa, all those plastic clips and weird construction. Even with the service manual http://www.olino.org/wp-content/uploads/2014/09/MagixmixManual4Pro.pdf and two videos of people taking one apart, it was still really difficult. Hate to mention this video, but it was the only one where the person actually takes the thing apart https://youtu.be/-MiH0MiNVxU
Turned out, the capsule clamp just needed to be really cleaned out. It was full of dried coffee.
Replaced the screws with #4 Philips head 1 inch screws with #4 stainless steel washers.
Without your blog thread, I would have never been able to get inside that machine and fix it. Thank you so much.
25 April 2017
Mary A. of Saratoga, California solved an air-lock problem in her Nespresso:
Thank you for your blog on repairing a Nespresso machine! I’m not at all handy, but it gave me the confidence to order the key off of eBay and try a couple of things rather than sending the unit to the landfill. In the end I figured out that I just needed to get rid of the air by doing this: http://www.whichpodcoffee.com/nespresso-problem-water-coming
I figured this out thanks to Mary M’s post from March 24, 2015. Appreciate you keeping this site going as I’m sure I’ll run into one of these problems some day!
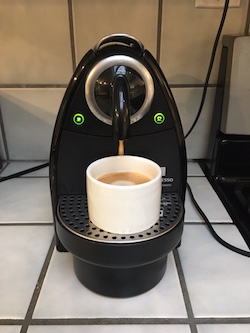
22 May 2017
Vagelis K. of Athens, Greece fabricated a socket to repair his Krups XN2125:
Congratulations on your great page on repairing the Nespresso coffee machine.
Mine, a Krups XN2125, started to have an erratic behavior, running water for a few seconds and not being able to program the time, and ended up in not working at start-up: the light was blinking normally as at warm-up and gone to a quick blinking. Being hesitant to send it to an authorized Nespresso service (knowing that this would cost me nearly as much as buying a new one on offer), and being an experienced DIYer, I searched the Web and, gladly, found your blog.
What I immediately realized is that the problem lied on the two MKP X2 capacitors, which had to be replaced. And, reading the long story in your blog, I understood that the main issue is with the weird screws used on those machines.
I will describe to you how I got off those weird screws. Firstly, I managed to unscrew one of the smaller and shallower front screws with a suitable hex socket. I would use this screw as a guide to make a suitable wrench. I happen to have a mini lathe, so it was easy for me to make an initial hole on a piece of brass rod. The diameter of the hole was the small distance of the ellipse of the head of the original screw. I also happen to be a dentist, so I have a lot of burs. I found a suitable straight cylindrical bur with which, by trying continuously on the head of the screw, I managed to shape an elliptical form for the wrench. After that, I made a slot on the other side and it was a piece of cake to take out all the other screws.
I attach a couple of photos of the wrench that I have made.
All the rest was straightforward and no problem encountered. I changed the two capacitors and reassembled the machine. I didn’t even had to change the screws to more “normal” ones, since screwing and unscrewing with the wrench I made was just as easy as with any other screw. So, my Nespresso is again back in use and everyone in my family is enjoying again their Nespresso coffee.
I just want to thank you for your great help. Without the hints and information provided in your blog, my attempt to repair my Nespresso would be much more difficult. So, keep up the good work!
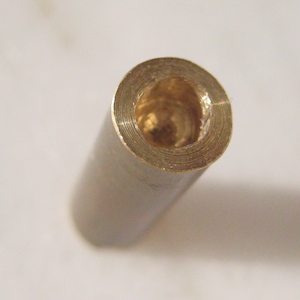
16 Aug 2017
Steve M. of Santa Rosa, CA found magic petroleum gel to repair a leak in his Citiz machine:
Hi, I am writing to say thank you for hosting and posting such good info to help nespresso owners get back to their morning fix.
My Citiz machine had developed a rather substantial leak. Enough that brewing a “cup” of coffee would basically fill the overflow tray under the used capsule container.
Thanks to info you posted, I used the “bic pen technique” to deal with the oval bolts. Once all the plastic shields were removed, I carefully hooked up the electronics, warmed up the machine and pressed a brew button, being VERY careful not to short anything. With shields removed, I could see that it was leaking from “somewhere behind the capsule.” Additional disassembly revealed that an o-ring was dry and water was coming out from the area that normally grips the capsule.
I ordered some of this: McGlaughlin Oil Company PETROL-GEL Lubricant, 4 oz Tube About $6 on Amazon, here is the link: https://www.amazon.com/gp/product/B002TWJ2L0
Petrol Gel is the number 1 sanitary lubricant used in the dairy industry and soft serve machines. The lubricant is made with an odorless, tasteless, high viscosity index paraffinic base oil. 4 oz tube Impervious to water FDA approved…
I slathered some of that on the o-ring and re-assembled. Leak-b-gone!
So, thanks again!
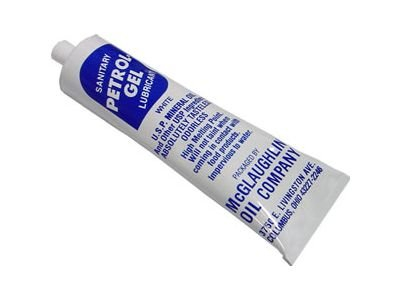
1 Sep 2017
Marco P. of Italy replaced the capacitors in an old Nespresso Krups XN2008:
Hi Chris this is Marco from Rimini, Italy.
I just want to say thank you for the good info found on your blog that helped me to fix an old Nespresso Krups XN2008
It’s an old machine one colleague brought at work that was turning on but as the “Cup” button was pressed was going off just after few drops of water
I got a bit crazy with the screws but the tool in the picture saved my day
Now I modified the screws so to use a normal screwdriver
I replaced the capacitors with new ones (80 cents well spent) of equal value, but just a little different in shape (the big blue bubble you see in the picture below)
The smaller one of 220nF is a bit longer (the gray one in the picture below) but the circuit board has a second hole linked with the original one that allow to mount it seamlessly
Thanks again
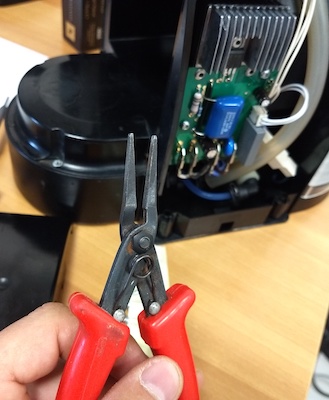
13 Nov 2017
Henry K. of Maputo, Mozambique asked about the erratic behavior of his Magimix M100, but all I could suggest was gunk blocking the flow:
We have a second hand Magimix M100 that we don’t use often enough. When I went to make a coffee yesterday, it went gbrr and nothing came out. Not one drop. As though it was blocked.
A bit of googling and watching of videos later, and having realised I needed to deal with those infamous oval screws, I stumbled on your website. Amazing! How the internet used to be!
I had resigned myself to paying too much for a special tool and it taking ages to arrive. After perusing your blog, I first thought of trying the long nosed pliers option and popped to the hardware store this afternoon. When passing down the school supplies aisle, the bic solution you wrote about sprung to mind so I picked up a couple of bics just in case. So, the first two screws came out easily with the pliers. However the others were too deep. Given how easily they had turned this gave me the courage to try the bic solution. First time and good for four screws! Thanks to the DIY genius who thought that up!
Case opened, water flows through - but not well. No air blocking pipes.
But the pump is still temperamental/blocked. I keep pushing the coffee button: it whirrs and then a drop or a stream comes out. It then needs turning on again. (Same problem as Patrick in Cape Town - did he ever fix his?) I thought it was the button, but I took that apart, wiped with cotton bud, and couldn’t see anything wrong with it. (Do I need a special cleaning solution?) Pressing hundreds of times, I have managed to fill four tea cups with boiling water. Occasionally a few bits of gunk/dried coffee come out. It is improving. But it is not getting better in a predictable way. Sometimes nothing; sometimes 1-2 seconds of flow. Any thoughts? I think I need some DIY descale tips. Or has something gone wrong with the little circuit board? Re-reading your blog, it looks like we might be in capacitor territory… :(
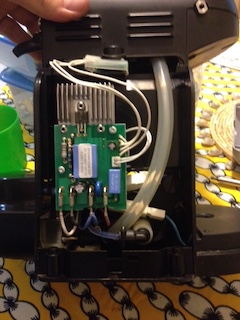
6 Dec 2017
Alex P. of Amsterdam, The Netherlands successfully replaced the capacitors in his Magimix M220:
My magimix m220 nespresso broke down with the rapidly blinking lights. Luckily I found your site! I opened the machine following your instructions, and replaced the 2 yellow capacitors: MKP-X2 MKP-X2-0.33 nF 275 V/AC 10 % 22.5 mm and MKP-X2 MKP-X2-0.68 nF 275 V/AC 10 % 22.5 mm for a total cost of 2€. The machine works like new again, saved me 150€ repair costs, thanks for the great help!
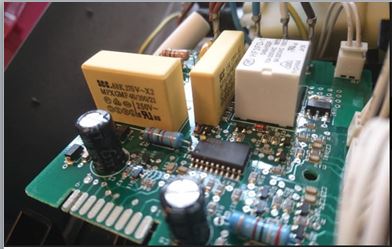
Stories in 2018
9 Feb 2018
Paulo F. of Portugal reengineered the buttons on his Krups nespresso after using a spring-steel grooved dowel pin to remove the oval-head screws:
Her’s my fix on the buttons on the nespresso. Here are the buttons i’ve used since the silicone ones are terrible.
https://www.aliexpress.com/item/2PCS-10MM-Mini-Metal-Button-Switch-3Pin-Momentary-Self-Released-Not-Locking-Power-Push-Button-Flat/32828588124.html?spm=a2g0s.13010208.99999999.262.Htqota
I’ve added a Led and made a hole for it. Her’s some pictures, with the overall look, of it.
Regarding the key to open the machine and remove those screws: Since the screw heads are oval you only have to buy a steel pin that fits the head. These kinds of pins
https://ever-hardware.com/wp-content/uploads/2017/03/Parallel-pin-spring-grooved-dowel-pins-tension-sellock-roll-black-galvanizing.jpg
https://szinsail.en.made-in-china.com/productimage/nSjEJlQOacVg-2f1j00rFDQczmdCpkf/China-Stainless-Steel-Grooved-Spring-Pins.html
These pins are very hard and will break before bending. They are also very cheap, you’ll have to buy one that fits the top of the screw. In case they break , you can easely replace it.

20 Feb 2018
Josep C. of Barcelona sent me a note about successful replacement of the thermal fuse and capacitors in his Delonghi Essenza EN95:
I am writing to you to thank you about the compilation of different issues that can plague Nespresso Machines. Thanks to the comments that you have in your blog, I was able to repair a Delonghi Essenza EN95 machine. Let me mention that I do not have any background on electronic engineering or repairs, but managed to find that one of the thermal fuses was not working. After replacing it, the machine started to work, but with the “mad blinking” lights problems.
I was able to have the Delonghi working for five minutes before the new thermal fuse stop working (blown up). It seems that the mad blinking lights problem was heating the boiler without control. Then, I decided to give a try to capacitors, and changed the big one (680 mF) and installed another new thermal fuse.
The machine works like a charm, I have been using it for a couple of weeks and everything seems to be okay.

27 May 2018
Erica C. of Toronto, Canada borrowed the socket and cured her machine of an airlock problem. She writes:
I hope you are doing well. I am reaching out because I found your blog on the internet about the Jura Capresso machine repairs. I recently found mine (an Essenza C100) in a closet when we were moving, and didn’t think about it (we have been serious french-press coffee makers!). When I went to try it of course it didn’t work. It is warming up, the pump is trying to work, etc etc… but no water.
We tried all the typical airlock techniques, but no dice. It took me a while but I eventually found your blog, and I am blown away! It is amazing how many years of history you have on there. I read through the entire post and I am just so thrilled to have found something so perfectly representative about what the internet should be!
Anyway, we tried the Bic pen technique and got 4 out of 6 screws out of the machine… the shallow ones came out right away, and the two on the left also came out fairly easily (my tip - when you melt the pen, leave it on the screw for the 30 second wait time… it really cements them into the plastic and makes getting them out fairly easy. I guess you have to make sure you don’t meld it to the actual coffee machine though.
The last two screws, the deep ones on the right, are fully stuck in there though. To the point where my pen actually broke under pressure before the screw loosened. After the success with the first screws, I don’t know how these others have gotten themselves so jammed. It is both the screws on the one side, I tried them both.
Anyway, I am wondering if you know if I can fix the airlock just having the left side of the machine accessible - there is clearly air in the tubes, I can see the bubbles. I think the tube I need to access is on the other side. If I do need to open it, do you still run your metal tool exchange? I have looked on ebay, unfortunately the recommended tool doesn’t ship to Canada.
(.. insert long wait here for the socket to travel .. :)
I spent last night opening it - the final screw put up a good fight. I managed to clear out the air (it was fully airlocked) by using a baby syringe filled with water. Good news is that there don’t seem to be any other problems with the machine and it has run through several rounds of water perfectly!
I will be replacing the screws with easier to use ones!
Thank you so much, it was well worth the wait - the bic pen just couldn’t get that last screw out!
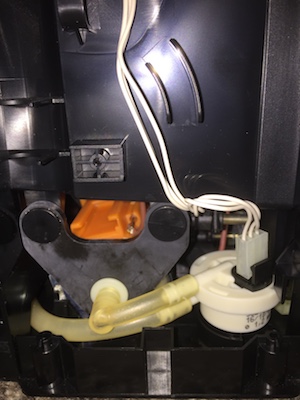
Stories in 2019
28 July 2019
Summer M. of Los Angeles, California borrowed the socket but a repair eluded her:
At first it was the part that you mention in your blog, using windex to clean it so the silicone had a connection. But then I put it together again and then the sensor that was telling it to stop pouring wasn’t working at all. So I took it apart again and cleaned it more. I can’t really find what it is online that I’m supposed to do to fix this issue. Heard of this by chance?
However, this time the button with the cup on it broke so the button isn’t attached to the square part anymore. I tried to rig it so I didn’t have to buy a new button, but it didn’t work. So now it won’t brew at all bc the button isn’t touching the circuit board right is my guess.
I’m pulling my hair out. It’s been a lot of time spent to fix this and doesn’t seem to be going in the right direction. I need to call Nespresso to see how much a button is. I can only find them on Ebay for more than they seem worth, especially if I just have to chuck the thing.
4 Oct 2019
Mary S. of Clive, Iowa was next in the queue for the steel socket and reported her experience:
I was able to remove those pesky screws and actually got the Nespresso running again. Yippee!! It is only used when my daughter visits (she and husband have another Nespresso) so I think it was an air lock. Thinking now I should turn it on and run a cup or two every now and then. I also bought replacement screws in case I need to take it apart again.
Thanks to you …. and your blog! 😃
Have a nice weekend!
9 Dec 2019
Richard C. of Hoddesdon, Hertfordshire, England found this blog and sent me his story:
Hello Chris,
Just wanted to say than you for your very helpful blog on repairing this machine. My machine is a Krups Nespresso XN2105, as repaired by Enzo of Turin in November 2012. I had the machine for around 12 years and it was very reliable, but then the Lungo and Espresso buttons started to flash in a ‘dot dash dash’ sequence and the machine would not produce coffee. I made a metal tool to remove the oval-head screws. I then replaced the two capacitors (220nF and 680nF) on the PCB and the machine now works fine. I also repaired my son’s similar machine, which had developed the same fault. I’m pleased to have been able to extend the life of these machines; they look pretty well made and I just hate to discard useful things.
Thanks again, and kind regards
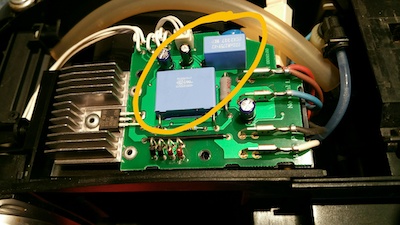
Stories in 2020
12 June 2020
Guy H. of Albans, Hertfordshire, UK sent me this epistle:
Hello Chris from St Albans, Hertfordshire, UK!!
I wonder whether you are still keeping your long-running Blog article running and up to date?
Inspired by it and after a little bit of experimentation, a few failed attempts, much determination not to be beaten by a stupid machine — and a jot of serendipity — I had success in opening up my Krups Nespresso XN2001 which has been serving me faithfully for many years…. using a new simple idea and solution which you and future readers may be interested in.
I guess I must have had it for about 15 years or more, with very regular use. A few years ago the red power button got dodgy — I managed to source a replacement one from the internet but as I was unable to get the screws out at the time, I had to fit it using a trick I saw somewhere on the web (can’t remember where now). This comprised unclipping at the top and gently prising and holding back the panel without removing it — followed by a kind of “keyhole surgery” operation through a very narrow access.
But recently the green coffee button started playing up — so I thought in the first instance I would just try cleaning up the contacts. This did the trick (again using access without unscrewing) — but unfortunately getting the rubber button back into its hole via a couple of inch gap at the top is very difficult, and I managed to break it. So I have been living with a “workaround” for a few days… using the sheared off rubber as a “key” — pushing it through the front to make contact with.the switch which I shifted slightly further forward (this picture taken after subsequently removing the panel:
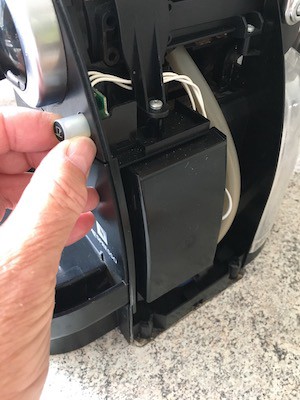
However this wasn’t particularly reliable or satisfactory — so I have sent off for a new rubber part. But as I didn’t want to risk breaking that one too, I though I would try to get the side off in the mean time, to give me better access and to make the repair easier.
After trying various things, and looking around the house and the garage, I was looking in my final place and was literally about to give up — when I found these in my stock:
I imagine you may have something similar over there — I call them “cavity wall fixings” — that you can use to fix things to plasterboard over bricks, or to other hollow internal partition walls.
So — I took the bolt out of one, squeezed the threaded end ever so slightly with a pair of pliers to make it oval — and fortunately/coincidentally the same size as the dreaded screw head… used pliers again at the other end to bend over the flange for easier leverage — and made this custom tool:
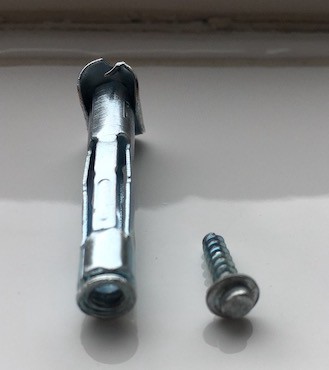
I inserted it into the recessed plastic channels which house the oval-headed screws, grasped the bent flanged end with my pliers, applied firm pressure into the machine and gradual anti-clockwise pressure — and although they didn’t really want to, amazingly both screws came out sullenly like two guilty children!!
So now I await the arrival of my new spare part through the post to complete the repair :-)
I thought you may just be interested, seeing as you have quite an interesting history on the topic!
Take care and kind regards
29 Nov 2020
Andrew v.d.M. of Cape Town, South Africa wrote me about those diabolical oval-headed screws:
I came across your page at [ ..] while trying to find a solution to those diabolical oval-headed screws (to hell with the manager who made that decision!) and just wanted to share a very simple solution I was lucky enough to come up with.
I have a small screwdriver set that includes the hexagonal M sockets. I figured that since the internal space of a hexagon was longer from corner to corner than it was from side to side I might have one that fitted. As it happened, the 3.5mm one fitted the oval, although not tightly enough for all the screws. My solution was to squash it slightly with a pair of pliers (a vice would have been better) and that worked perfectly.
I wasn’t able to fix the machine though. The descale flashing refuses to be reset even though taking it apart revealed that it did not need descaling. Kind regards &rew
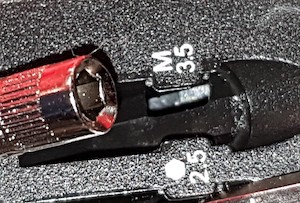
23 Sep 2021
My Nespresso story has reached an end. The search engine results no longer include this blog if you search for machine repair help, plus the old machines with the oval-head screws are 10+ years old so most people will not attempt a repair. And just yesterday my original machine stopped working. It’s over 14 years old and now has the same symptom that Demetrios B. from Cleveland, Ohio reported in 2014: the warm-up light blinks forever, and with that light blinking instead of staying lit, I cannot start the machine pump.
Hey search engines: this page was formerly available at URL https://www.maultech.com/chrislott/blog/20100627_nespresso.html
Blog index / feedback to christopher döt lott át gmail dðt com